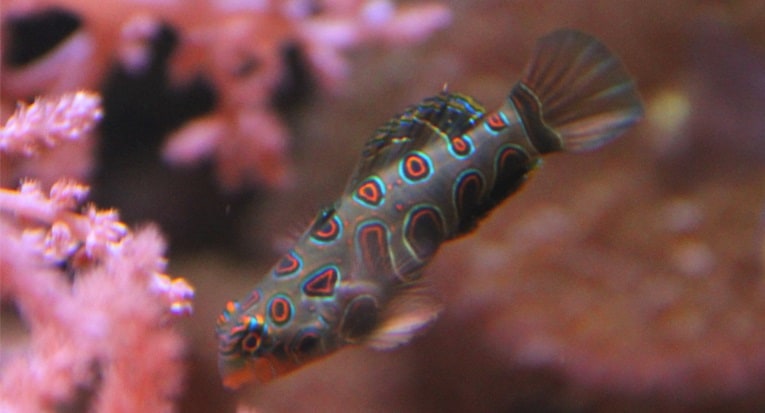
Mandarin Gobies, also known as Mandarin Dragonets are one of the most stunning fish you can see swimming around your aquarium. The problem is they can be hard to keep, especially for the beginner to saltwater aquariums. What is it that makes these beautiful fish have such a poor survival rate in home aquariums?
Mandarin Dragonets can be hard to keep as Copepods are their main food source. Consuming a pod every 5-10 seconds keeps these fish healthy and only mature aquariums with a large reproducing Copepod population are suitable enough to provide enough food. Some can be trained to accept fish food.
Many beginners to saltwater aquariums see these fish and put them at the top of their purchase list only to have the fish die weeks later. This article was written to bring awareness to the feeding habits of the Mandarin Goby, and why a little patience will usually pay off.
What Makes Mandarin Gobies Hard To Keep?
Mandarin Gobies are a carnivore and in the wild, their predominant food source is a small critter called Copepods. Copepods may be seen scurrying around mature aquariums, especially at night. Copepods will naturally grow in your aquarium and help with janitorial services as well as becoming a natural food source for your livestock, but it takes time!
For more information on Copepods check out the article in the Further Reading section at the end.
The natural feeding habit of the Mandarin Dragonets is that they are hunters and they eat constantly throughout the day. You will see them perching on the sand and rock looking for their next meal. A healthy Mandarin Goby can eat a Copepod every 5-10 seconds during their daily routine.
6-12 x 60 minutes = 360-720 Copepods eaten per hour
360-720 x 14 hours awake = 5,040-10,080 Copepods eaten every day
So, for each Mandarin Goby in a tank, they can mow down between 5-10,000 pods every day! This gives you some idea of how much they eat. Even if we took a very conservative number and had them eating one every 20 seconds, that’s still around 2,500 pods eaten every day!
If your aquarium does not support this amount of Copepods you can see that in a few short weeks the Mandarin will starve to death.
Many newcomers to the hobby do not do research on this fish, they just see it in the store, buy it and then wonder why it’s not eating the flakes and pellets that all the other fish eat. This is why they are so hard to keep, for those that have not done their research.
So, if these fish are so hard to keep, how come so many people own them without any problems? The trick is to ensure you can keep them fed in your aquarium.
How Do You Feed Mandarin Gobies?
By far the easiest way to ensure the survival and healthy eating habits of the Mandarin Goby are met is to ensure your aquarium is mature enough to have a healthy, reproducing Copepod population.
This usually requires the aquarium to be at least 1-2 years old! It is not a good idea to put in a Mandarin after you have seen only a few pods scurrying around. Your pods need to reproduce faster than the Mandarin Goby eats them or the food supply will eventually run out.
To help start and maintain a healthy Copepod population you can implement some of the following:
Install a Refugium
A refugium is a small area dedicated to growing macro-algae and providing a ‘Refuge’ for Copepods and other macro-fauna to reproduce without being eaten.
Refugiums can come as a dedicated area in a sump or a hang-on container that hangs on the side/back of a sump or the aquarium. Water is passed through them and by placing some rock rubble in there you can create a nice haven for pods to reproduce.
For more detailed information on Refugiums see my dedicated article in the ‘Further Reading’ section at the end.
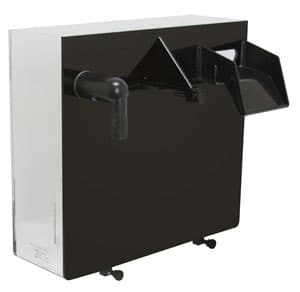
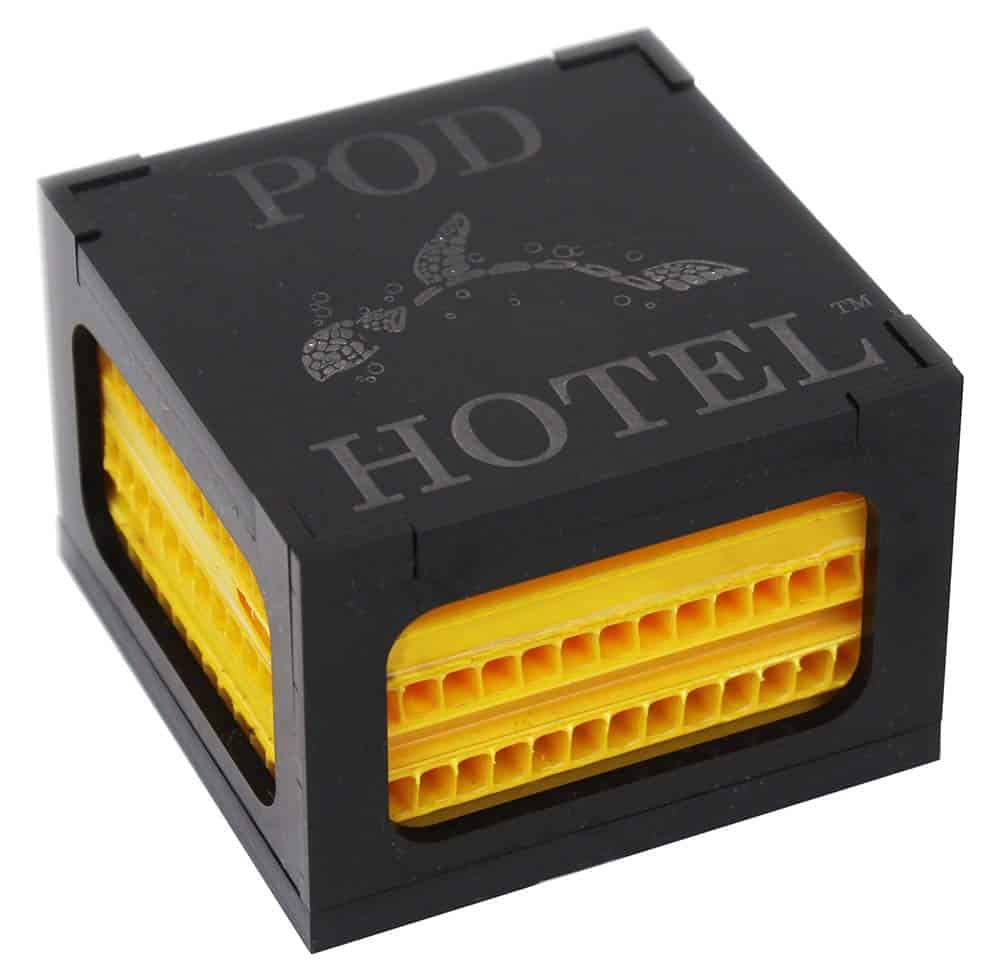
Install a Pod Condo
This is exactly what it sounds like – It is a condo/apartment for Copepods and other macrofauna to reproduce in without getting eaten. They are a small cube filled with holes and passages that give the pods a refuge.
These pod condo’s/hotels/habitats can easily be inserted into a sump, the filter chamber of an All-In-One aquarium, or even at the back of the rock in your aquarium to remain out of sight, but give sanctuary.
Being only a couple of inches across, they are a perfect way to allow your aquariums pod population to grow to provide ample food for Mandarin Gobies
If you know you want a Mandarin Goby but your aquarium is not mature enough for one yet, you can begin to create a healthy Copepod population by inserting a Starter Colony into your aquarium.
Combined with a refugium or pod hotel, this kit will allow your colony to rapidly grow to be able to sustain a Mandarin Goby. Copepods will enter your aquarium over time, via coral frags, and from your initial installation of Live Rock or Live Sand, but the starter kit dramatically increases the time it takes to grow a colony.
How To Train a Mandarin Goby To Eat Prepared Foods
Getting a Mandarin Goby to eat the foods you give to the tank is the holy grail of ensuring their survival. It can be done, but for the majority of owners, they are unsuccessful.
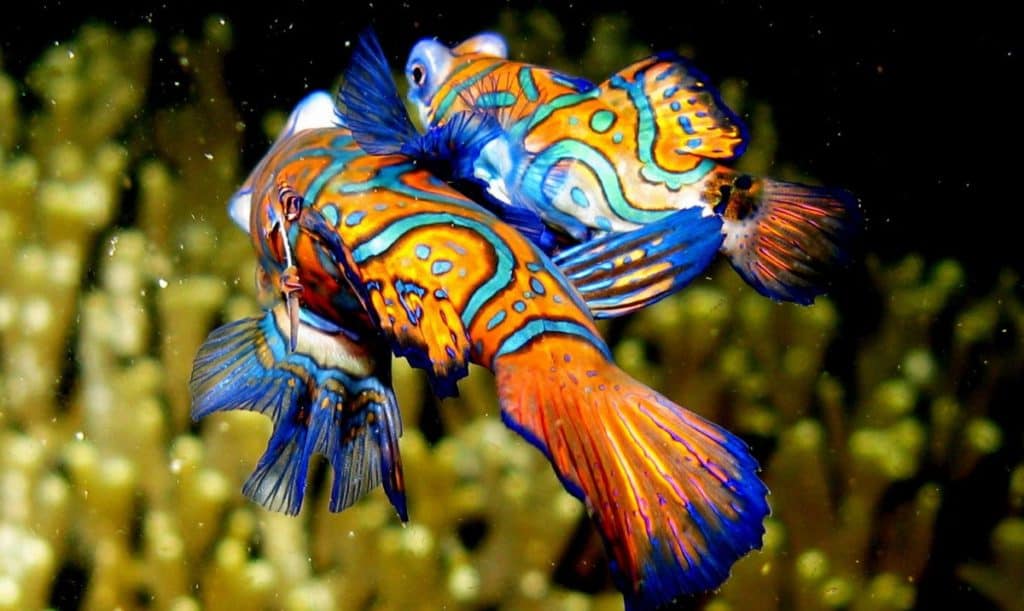
A Mating Pair of Red Mandarin Gobies – Source: Steve Childs
Here are some ways you can try to get a Mandarin Goby Feeding:
Observe the fish in the store and ask the staff to feed it for you. See what they feed it, see how it eats. Does it instantly devour the food, or does it ignore it?
Try and obtain a ‘Captive-Bred’ fish. They tend to feed better on prepared foods
Ensure the fish is fat and healthy. Look at the area just behind the skull. If it looks thin or pressed in, pass on that fish
Mandarin Gobies are notorious for eating in the store then not eating after arriving at your home. be prepared for this
Insert your new purchase into a quarantine tank (you should do this anyway) and practice feeding your Mandarin prepared, live foods without having to compete with other fish in the aquarium
Regularly buy live Copepods and feed your tank with them after lights out. This will give the pods a chance to seek refuge without being decimated by the rest of your fish You can Purchase bottles of live Copepods Here at Amazon.com
Mandarin Gobies have been known to feed on Brineshrimp, Mysis Shrimp & Black worms, but by far the best food is their natural food – Copepods
To Finish
Mandarin Gobies are beautiful fish and by having some patience and allowing your aquarium to mature, and getting it started with a Copepod colony, you will have far better success at keeping a Madinarin Goby alive past a few weeks.
I have seen many, many aquariums, even nano-reefs, that have a fat and happy Mandarin cruising around looking for their next meal only because they let their tank mature or they were successful at training their Mandarin/s to eat frozen foods.
The one thing you have to bear in mind when you have a Mandarin Goby only eating frozen foods is that they need to be fed at least morning and night and this will require a tank sitter for anytime you are on vacation!
Further Reading
You may find the following articles helpful to you:
If you own an aquarium you should be aware of a probable mold problem they could cause. When we moved across the country to an older home and the winter first winter arrived, my 75 gallon aquarium starting to give us moisture problems, and if we had not dealt with them quickly it could have easily turned into a mold nightmare!
Tropical freshwater and saltwater aquariums evaporate water due to the warm temperature of the water. An aquarium over 50 gallons can evaporate over 1 gallon a day & begin to raise home humidity above the recommended 30-50%. Excess moisture can lead to mold on walls, ceilings, carpets, and clothing.
Our first sign of excess moisture was on our windows, then when we pulled out our couch for cleaning, the walls were covered in moisture. This soon had my wife not happy with me and my tank!
This article was written to pass on my research, findings and what we did to combat our moisture problem before it could potentially make us sick!
What Is Mold Exactly?
According to WebMD, mold is a fungus made up of very small organisms and can be of a variety of colors. For mold to grow and reproduce they need a humid environment – Our aquariums can easily provide this!
Mold reproduces by releasing spores into the air, when a spore lands on a damp surface it begins to grow and replicate further. In small amounts, mold is generally harmless, but if left to reproduce into larger volumes it can begin to make humans and animals sick and can also destroy your home.
Do Aquariums Increase Humidity In Homes?
The typical water temperature in an aquarium is around 78°F-80°F with our home ambient room temperature around 70°F-72°F. This 8-10°F causes water to evaporate from the aquarium and disperse into the room causing the humidity to rise. The larger the temperature gap, the more water evaporates.
My aquarium sits at 80°F and I try to keep my home around 72°F. This 8° temperature difference is enough to pull out 1.5 gallons of water from my system via evaporation every day. with modern homes now being selaed tight from draughts this can raise the humidity significantly in the home.
During winter months when the outside walls are cold, especially in older homes, this can cause the moisture suspended in the air to condense and form moisture on the walls of the room containing the fish tank. If left, this moisture can create damage to the walls, and trim and turn into mold.
When this moisture is released into our homes it can create problems for the homeowner, or it can be no issue at all. There are so many factors that can influence how well your home handles the evaporated moisture and two identical aquariums can affect each home they are in very differently.
According to the Mayo Clinic, our homes should be kept at a Relative Humidity level of between 30%-50% to avoid health problems. As the humidity level begins to increase over 50% this is when mold can begin to become noticeable in our homes, dorm rooms, offices, or any area containing an aquarium.
The larger the aquarium, the more water it can evaporate into the surrounding air.
Here is an excellent article published by Oregon State University about humidity in our homes and what can affect how well it handles moisture. It is definitely worth a read! You can find it Here.
Does Excess Humidity Cause Mold?
Excess moisture in a home can lead to mold growth. Home humidity should be kept between 30% and 50% to ensure optimum health. When homes begin to increase humidity over 60% it is advised to install and run a dehumidifier to prevent excess moisture from forming and tuning to mold.
As stated, the ways in which our individual homes, office, etc deal with the high humidity caused by our aquariums can vary dramatically.
Your home can appear to be completely free of mold but once an aquarium begins to add moisture, the mold could begin to show. A small unseen patch of mold can soon grow once the humidity of the room begins to rise.
Now, this is not to say that all homes will begin to grow mold the second an aquarium is installed, but an aquarium added to a room could bring mold issues if the additional moisture ingress cannot be handled by your home.
Damp Wall Cause By High Humidity
Mold likes to grow on floors, walls, carpets, appliances, furniture, and anything that can provide a surface and food for it to grow. The most typical places homeowners find mold growing are the areas containing lots of moisture:
Kitchens
Bathrooms
Attics
Windows
Basements
Generally, areas of poor or low ventilation will be the first areas you may notice that you have an excess humidity problem. This is how my wife and I found moisture on the walls behind our couches. They were pushed right up against the wall and because our house is 100 years old and with winter being in the -40’s here, the walls get cold.
Our Kids Duplo Blocks Work Great As Spacers!
This lead to condensation forming on them. Our solution was to move our couches away from the wall to allow air to flow around the back – This cured the moisture problem there! If we had not done this mold would have soon appeared!
What Are The Signs Of Mold Growth?
As aquarium owners, it is a good idea to know what the signs are so any issues can be dealt with before they become problematic. Trying to eradicate a large mold infestation could be costly as it usually requires professional help.
Signs of mold growth to look for are:
Cracked paint
Discoloration on walls
Surfaces and fabrics feel damp
Wall surfaces becoming soft
Warped flooring
Musty odors
The main signs that will help to find potential problem areas is looking for the moisture. If an area is a dry mold will not grow. Find the moisture, you find the potential problem area. If you can handle the moisture problem quickly you can prevent mold from showing up.
Is Mold Dangerous?
Mold can cause many problems and can become dangerous if allowed to grow to large volumes, any problem areas need to be dealt with quickly. Here are some situations where mold can cause problems:
Destroys Fabrics – Mold can destroy your clothes, furniture, and any fabric item that it is allowed to grow on
Destroys Wood – Mold can cause dry rot to wood structures which usually requires a professional to deal with it. This could get very expensive
Destroys Carpeting – Cleaning my not be enough, complete removal may be necessary
Bad Odor – Mold can cause a very bad odor that cannot be removed completely
These issues above are generally superficial. We can replace and fix those issues. The major issue with mold is that it can become very dangerous to us, our family members, and our pets. This is the main reason that mold cannot be allowed to grow in our rooms.
Health Problems Caused By Mold
The main issue with mold is that mold spores can be inhaled into the lungs where they produce Mycotoxins. These mycotoxins can cause allergies. The symptoms of mold exposure include stuffy nose, wheezing, red or itchy eyes, and skin.
Mold Spores Growing
Allergies generally don’t sound much of a problem to most people but those who have asthma can have an intense reaction upon exposure.
Can Mold Cause Severe Health Problems?
A study conducted by the Institute of Medicine in 2004 proved that there is a link between mold exposure to respiratory tract symptoms in healthy people, asthma, and hypersensitivity pneumonitis in people with the immune-mediated condition.
Not only does mold irritate the respiratory system, but there can also be other health risks that include:
Infection
Pulmonary Hemorrhage
Toxic Mold Syndrome
Headaches and Sore Throat
Sinus Problems
Eye Irritation
Regular, Unexplained Bloody Nose
Now these symptoms above are when mold is at severe levels but, it can also be affected by:
The conditions of mold growth
Length and amount of exposure to the mold
Individual sensitivity to the mold
The people who are at the most risk for health problems related to mold exposure are generally:
Infants
Children
The elderly
Individuals with weak immunity
Individuals with allergies
Individuals with underlying lung disease
Individuals with chronic respiratory disease
This is why as aquarium owners we need to be aware of the signs of mold because as adults, we are generally not the ones who become affected by any mold outbreak. Keeping an eye out for signs in your family members or work colleagues (depending on where the aquarium is located) will be the best way to spot any potential problems.
How Can Mold Caused By Aquariums Be Prevented?
Some of the best tried and tested methods, not only tried by myself, but also from researching other aquarists wish moisture problems are to:
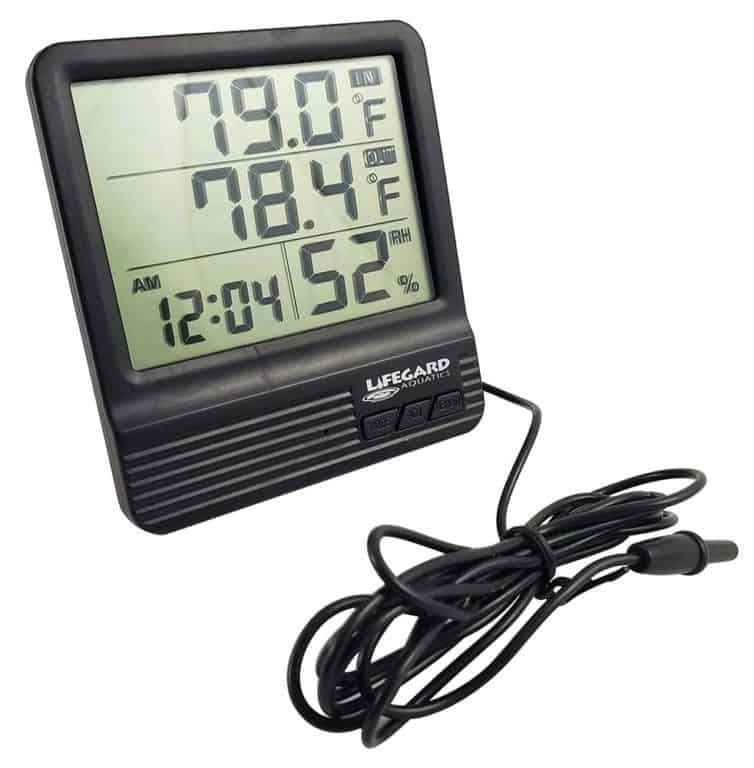
Monitor the humidity level with a simple Humidity Meter. I love this one at Marine Depot as it doubles as a digital thermometer for your tank. Mounting this close to your aquarium allows you to quickly and easily keep track of both your aquarium water temp and the room humidity:
RICHARD’S TOP PICK
Lifegard Aquatics Digital Thermometer / Hygrometer
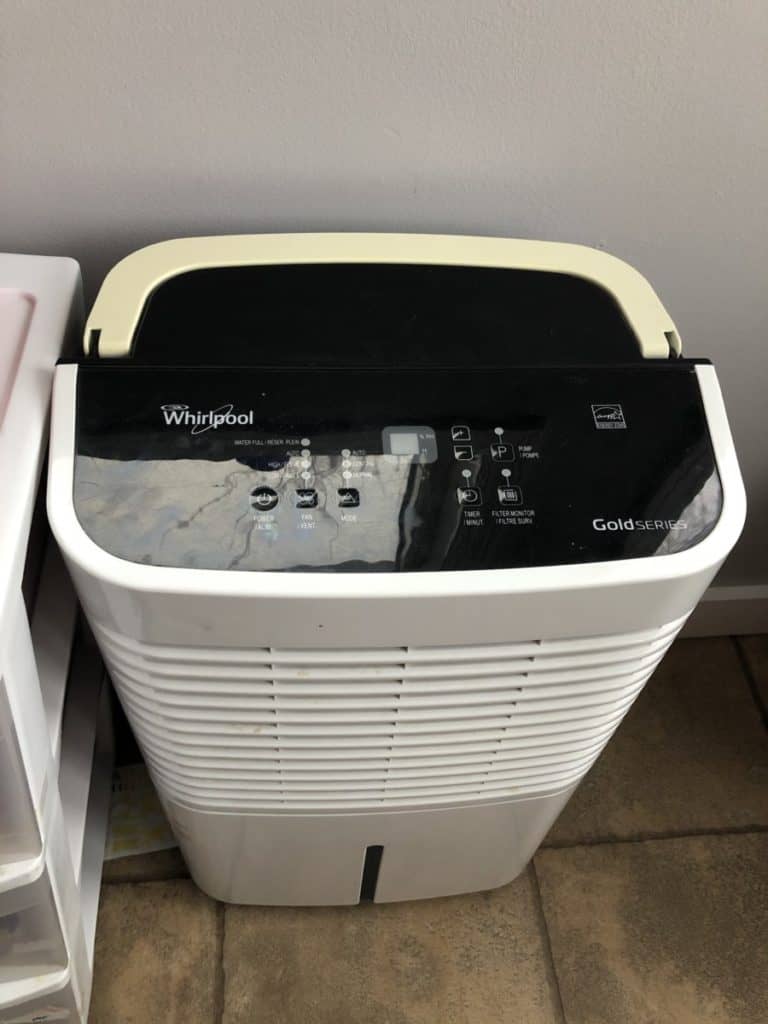
Keep the humidity level in the room, home, or office between 30% to 50%. A portable dehumidifier or an air conditioner can do the job.
We have a portable dehumidifier that sits in the kitchen and we turn on as needed when it gets really cold and our humidity starts to creep up to around 45-50%.
It has worked great for years and it amazes us how much water this thing pulls out of the air!
You can find a nice selection of Dehumidifiers of all sizes with Free Shipping Here at Amazon.com
Our Dehumidifier For When It Gets Really Cold Outside
Fit a HEPA filter to your home HVAC system to help remove mold spores from the air
Use exhaust fans to ensure proper ventilation, especially in the kitchen, bathroom, and an area where you keep your tank or lots of tanks
Using covers or canopies on your aquarium, sump, frag tank, QT tank will help minimize evaporation loss – Just be sure to leave some gap for gas exchange from the water
Experiment with the room temperature. You may find a sweet spot where no moisture forms
Improve the insulation of the walls if you are planning a reno or moving to a new home and before installing a large aquarium
Before installing a large aquarium, paint the walls closest to it with bathroom paint containing mold inhibitors
Use ceiling fans or the HVAC blower to help keep air moving around the home/office during humid periods of the year
Seal leaky windows and doors with new weather stripping or heat-shrink plastic systems like This One from Amazon.com
Prevention is far better than having mold grow and then having to deal with it, but if you do find areas of mold growing there are several ways you can quickly remove it before it gets too large an area.
How Can Mold Caused By Aquariums Be Removed?
Once mold starts to grow the only way to deal to really prevent it from coming back is to remove things on which it grows or replace that material. This is easy enough if it growing on things that can be replaced, but what about the areas that cannot be replaced:
Properly clean and dry that area to avoid it from reappearing
Mold growth from hard surfaces can be removed with soap and water or by using bleach diluted with water (1 part bleach, 2 parts water)
If you are using bleach then do take precautions:
Do not mix bleach with ammonia or other cleaning products otherwise, it could produce dangerous toxic fumes
While cleaning always open windows and doors for fresh air
Always wear gloves and eyewear
Seek professional help if cleaning larger areas are required
If proper precautions are not followed, mold removal can be extremely hazardous to your health. Always seek professional advice if you have a large area of mold.
To Finish
Having an aquarium at home is a great hobby. However, you need to understand that it can cause additional humidity which in turn COULD cause mold to grow in your house. Mold can be a very serious problem.
Always keep an eye out for it, keep the aquarium surroundings clean and dry, and be aware of the symptoms to identify any mold-related health issues within your home of work.
Further Reading
If you found this article helpful here are a few more you may like:
I have been recently looking at new homes and my wife could tell all I cared about is where my aquarium would go!!
This is a decision that every aquarium owner is faced with every time they wish to install an aquarium in their home. Whether it be a Betta Bowl or a 500 gallon reef tank, the answer to where should you place your aquarium is different for every home, but there are some important tips that can really help you make the right decision
The best location for an aquarium is in a room or position that provides maximum viewing pleasure. Also consider easy access for maintenance, lighting, air circulation, and the weight of your tank with people standing beside it. Avoid drafts, speakers, windows, doors, bedrooms and kitchens.
Most of the other posts on the web all talk about the same things, but what I’m going to reveal to you in this post is the things I’ve found while doing maintenance and installations on countless aquariums.
Some of these things can really destroy an aquarium in more ways than one…
Usual Aquarium Locations Everyone Talks About
All the other posts talk about the following things to think about before placing your aquarium and they do warrant thinking about but you may have read about this tips already:
Doors – Banging doors stress fish
Drafts – Play havoc with maintaining water temperature
Speakers – Vibrations in the water stress fish
Electrical – No outlet nearby is a problem
Windows – Direct sunlight can cause algae issues
Bedrooms – Noise and blue lighting spectrum can disturb sleep
Kitchens – Cooking oils can affect water chemistry
Feng Shui – Creating the right energy from its positioning
While all of these are important factors these next tips are what I can assure you will make or break the longterm success of your aquarium:
Does The Location Support Aquarium Weight?
Aquariums can get heavy real quick!!!
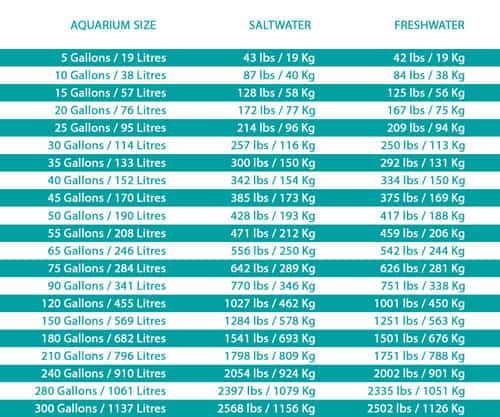
Freshwater weighs around 8.3lbs/3.8kg per gallon Saltwater weighs 8.6lbs/3.9kg per gallon.
Take a look at this chart to see the weight for the size of the tank you are looking to install:
When I was pondering the ‘Where should I place my aquarium?’ part of my build I decided on the location for my 75 gallon reef, but I knew the tank was going to be close to 650 lbs just for the water, 50 lbs for the stand, 50 lbs for the glass, then also the one thing many people forget about – People viewing the tank!
When I have parties, you can guarantee there are always 3-4 people looking at the tank, and double those viewer numbers if it was a peninsula-style aquarium!
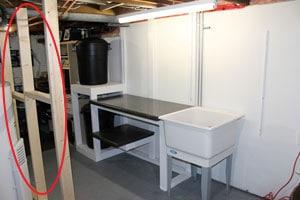
My house is 100 years old and I wanted to make sure that the floor could take 1000-2000 lbs of weight within a 5 ft sq area around my tank! So I supported the underside of the floor area in the basement
Now you may only have a 20 gallon tank that is going in your son’s bedroom, but remember this thing is going to weigh close to 200 lbs. Do not go putting the tank on a shelf above his bed ‘because it looks cool!’
My Under Tank Support
Once an aquarium is set up, its location is final! You can not even move it 1” (unless it is a 1 gal Pico Aquarium). If you get this location wrong you will have to empty the tank and then move it. All this adds stress to fish.
Trying to move an aquarium with any amount of water in it adds tremendous loads to the glass and seams which could damage the integrity of the aquarium.
The other problem that I have seen is that aquariums need to be completely level and the stand seated correctly to evenly distribute the immense weight of the water to the floor. When a floor or an incorrectly made stand begins to bow or sag it places pressure points onto the glass of the aquarium.
Google ‘Burst Aquariums‘ and just see the mess an exploding tank makes to a place! The weight of the aquarium and where to install it needs a good bit of research, especially if your home is old like mine!
If you want more information regarding the weight and support ideas please see the article in the Further Reading section at the end of this post.
Selecting Location For Aquarium Maintenance
This is by far THE BIGGEST factor when it comes to an aquarium’s downfall. Placing an aquarium where access for maintenance is difficult eventually makes the owner procrastinate.
The regular maintenance begins to drop off month by month and then an algae bloom, ammonia spike or tank crash prevails because the tank became a detritus factory!
There have been some aquariums that I absolutely dreaded working on because they were such a pain to work on. Tanks like this may look great at first, but I can tell you they do not last many years before their demise.
Here are some of the aquarium installation locations you should try and avoid if possible:
Aquariums in busy areas – Shops, offices, and waiting rooms are brutal for maintenance unless completed out of hours
In Wall aquariums with no or limited access from the sides and back
Aquariums behind furniture – Having to move half the room around every day just to get to the tank soon gets tiresome!
Very tall aquariums where you cannot physically reach the bottom of the tank with your arms. Delicate work trying to remove a dead fish or place a coral using long tongs can make a 5 minute job take 30!
The easier it is to work on and access all parts of the aquarium and its equipment the more likely the maintenance will stay regular. Having a sink and water supply close by is super handy, having an area you can clean out a stinky filter is nice, getting water to and from the aquarium without spilling is essential.
It is little things like this that I really wanted to place the sump for my reef tank in an area that had all these and also at a height that was comfortable to work at. Kneeling into an aquarium stand for 30 minutes each week can hurt your knees. Yes, I’m getting old now I’ve turned 40!
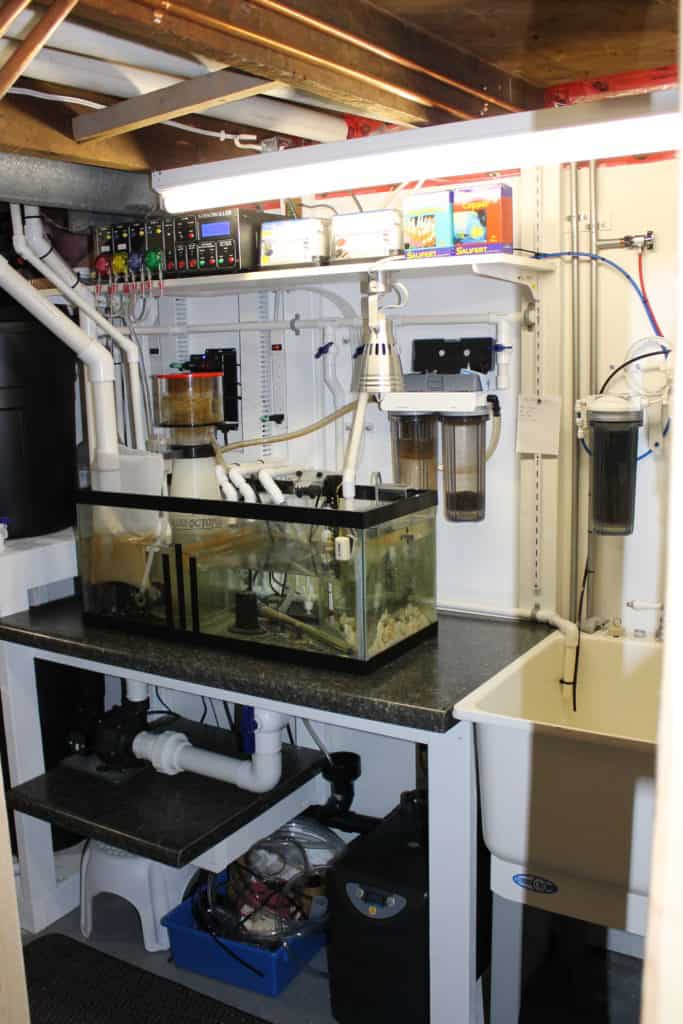
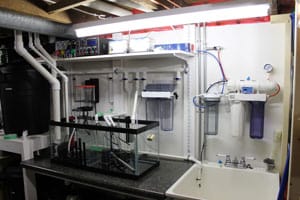
My Sump In My Basement
I was so fortunate enough to have a basement in my house and it only cost me a few hundred dollars for a return pump to move the water up approx 14ft to my tank, but I can tell you my maintenance is a breeze! If you can do an installation like this, you will not regret it!
I understand not everyone will have that luxury so keep your aquarium stand neat, tidy, and clean – Have all your maintenance tools, food, medications easily accessible but out of sight. Hooks, shelves, and draws can be easily fitted into your stand to house your stuff.
The point I’m trying to make here is to place the aquarium as best you can to give you the easiest maintenance. The easier it is, the faster it is and the more you will want to do it. When maintenance begins to slide, the aquarium starts to decline!
Location For Maximum Aquarium Viewing Pleasure
This is the NUMBER ONE reason why most of us get an aquarium – To enjoy the beauty of an underwater world in our home or office! The movement, the colors, the interactions, the learning, the bond we all form with our aquariums is like nothing else.
Placing your aquarium in the best spot to sit and enjoy it is the most important factor, but to get that spot suitable we have to look at everything mentioned in this article, because if the viewing spot is right but the location is wrong then you could have years of trying to figure out why fish die unexpectedly!
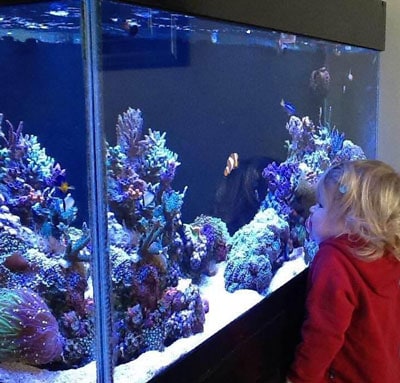
My Daughter Loves Our Reef
To me, the best location for a home aquarium is where you can sit back, relax, and view it without moving your head. Across from the couch, on your office desk, Heck, get rid of the TV and give that real estate to your aquarium!
Aquariums help to reduce stress and sitting back with your favorite beverage for 30 minutes of aquatic therapy works wonders, especially when the kids have gone to bed and the house has gone quiet!
I hate seeing photos of aquariums stuck in hallways, behind couches, in formal dining rooms to be viewed only when entertaining. An aquarium should be given pride of place in the most commonly used room of your home or office because it will then ensure you keep it clean and it will become a focal point that you will be proud to own and show off to anyone that shows interest!
To Finish
Finding the right location for your new aquarium takes a little bit of thought but ensuing the floor and stand can take the weight, you can easily do maintenance and you can enjoy the view of your tank are paramount.
There are thousands of aquarium photos all over the web so I ask you to go and look at some of them and try and pick faults with their locations to help you get a better understanding so that you can pick the ultimate spot your aquarium deserves!
Every saltwater aquarium will go through stages of algae and for some, those stages never seem to end! I’m battling Bubble Algae right now and a Foxface Rabbitfish and two Emerald crabs are slowly destroying it.
When a saltwater aquarium is within its first few years there will be times when it gets unexpected algae outbreaks but there are critters, techniques or products that will allow this ugly mess to be removed and when those do not work patience or better housekeeping will usually do the trick.
Some of the Best Saltwater Aquarium Algae Eaters are:
Cerith Snails
Nerite Snails
Mexican Turbo Snails
Mithrax Crabs
Conch’s
Nassarius Snails
Bristletooth Tangs
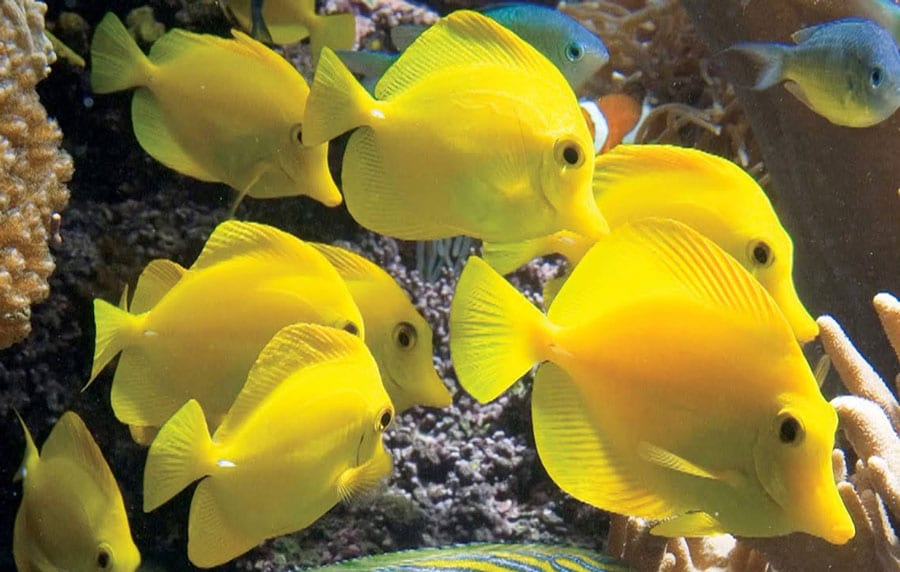
Yellow Tangs
Lawnmower Blennies
Foxface Rabbitfish
I have gone through many different algae blooms in the life of my saltwater hobby and I always researched the best way to tackle each outbreak with pretty good results.
In this article, I’m going to go through some of the most common types of algae and discuss the best animals, products, or methods to deal with each algae so that you can bookmark this and use it as a reference ready for when the next algae rears its ugly head!
Before we get started you can find a great selection of snails, crabs, invertebrates, and fish to help you control your algae and reference while reading this article.
I highly recommend SaltwaterFish.com
They have an awesome selection, great prices and their shipping is fast and reasonably priced.
There are many reasons why I and many, many experienced reefers recommend them. Please feel free to take a look HERE at SaltwaterFish.com
AND,To Help You Even More…
Use the following coupon code to get your first order SHIPPED FREE: firstfree
What Are The Most Common Types of Nuisance Reef Tank Algae?
At some point you will find one, some or all of these appear in your aquarium over its first few years. Some of them are just part of the aquarium ecosystem settling down and some are nuisance hitchhikers!
Film Algae
Hair Algae
Diatoms
Dinoflagellates
Bryopsis
Cyano
Bubble Algae
Let’s look at each of these individually to see how best to tackle them…
Eliminating Film Algae
The green ‘Film’ that coats your glass! You will always have some of this no matter how clean your tank. How fast it grows will depend on each system. Direct sunlight can help to fuel its growth!
Best Ways To Deal With Film Algae
1. Techniques:
— Scraping — It is so easy to remove using a Magnetic Algae Scraper, especially one with a razor blade attachment. I clean my glass every 2-3 days and the blade just scrapes it off in sheets, which my fish then go nuts on, especially my Yellow Tang.
You can find a Great Selection of Algae Scrapers Here at Amazon.com for every sized aquarium. I have used the Magfloat for years and the Flipper is also a great alternative!
NOTE: Whichever glass scraper you purchase make sure it is for glass or acrylic. Using a glass scraper on an acrylic aquarium will scratch it instantly! Trust me I have seen it done many times!
— Sunlight — If your aquarium gets direct sunlight then it will help to fuel Film Algae. I have one corner that gets a tiny bit of direct sunlight first thing in a morning and that corner is always heavier with green.
By keeping curtains closed or initially setting up your aquarium out of direct sunlight will help keep Film Algae to a minimum.
2. Algae Eaters:
Cerith snails – Cerithium sp.
Nerite snails – Nerita tessellata
Astrea snails – Astrea tecta
Turbo snails – Turbo sp.
These are all great for munching on this type of algae and you will see they leave interesting tracks all over your glass. They will not keep your glass completely clean, but they do help. The algae also feeds them as they scavenge for waste and uneaten food left around your aquarium.
Cerith Snails
The snails will help to keep it at bay on the rocks and other places you may struggle to reach without a scraper, but they will never be able to keep your aquarium free of it.
Between scraping every couple of days (I can scrape my whole tank in under 2 minutes) and the snails munching it off the rocks you should never have a film algae problem.
3. Products:
Film Algae is such an easy algae to keep on top of there is no real demand for a single treatment to be developed to tackle it. Between regular scraping, avoiding sunlight, having good quality source water (more on this later), Film Algae is one of the easiest to deal with.
Eliminating Hair Algae
One of the most common nuisance algae types and you will be sure to experience it at some point. It’s hair like appearance gives it its name. It will grow mostly on rocks and equipment and can grow fast!
Best Ways To Deal With Hair Algae
1. Techniques:
— Picking — Manually getting your hands in there and picking is the fastest way to remove this stuff and the second you see it you need to try and remove it all before it has chance to spread, then leave the livestock and clean-up-crew to pick at the remains and bits you cannot reach.
— Rock Removal — If you are lucky enough to have this stuff first show up on a small piece of rock that has no corals on it and it can be easily removed then remove it and bleach everything on the rock. It is far easier to deal with a small rock than an aquarium full of this stuff!
2. Algae Eaters:
For smaller and also large aquariums I recommend:
Scarlett Hermit Crabs – Paguristes cadenati
Emerald/Mithrax Crabs – Mithrax sculptus
Lawnmower Blenny – Salarias fasciatus
Tailspot Blenny – Ecsenius stigmatura
Cherith Snails – Cerithium sp.
Fuzzy Chitons – Acanthopleura
Conch’s – Strombus sp.
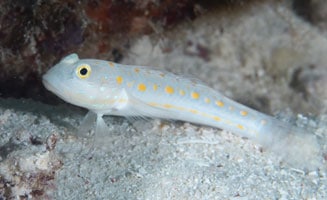
These are great at mowing this stuff down. If Hair Algae is growing on your sand bed, a Diamond Goby (Valenciennea puellaris) will keep your sand pristine.
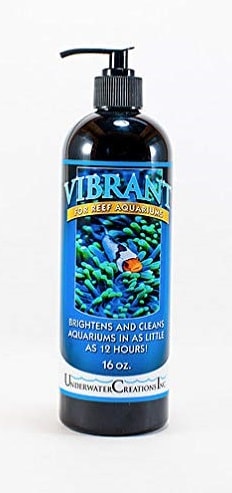
Many aquarists seem to be getting very good results from a fairly new product called VibrantAquarium Cleaner by Underwater Creations.
Vibrant uses multiple strains of bacteria to attack the algae from different angles. One of the bacteria strains targets the Nitrates and Phosphates that feed your algae and turn them into biomass to be removed via your Protein Skimmer or water changes.
This product is also designed to work on any problem algae, according to the manufacturer.
You can read the forum thread HERE on Reef2Reef where Jeff the owner comes on and joins in the conversation regarding it! – Cool!
“Vibrant is a true beast and we have not yet come across a algae that Vibrant can not beat out. Below I will list a general timeline of how fast Vibrant works on frequent algae strains that cause issues in reef aquariums”.
Cloudy/hazy Water– 1 dose Diatoms – 1-2 doses Cyanobacteria – (Yes, it will outcompete another bacteria) 1-5 doses Dinoflagellates – 2-5 doses Bubble algae – 3-8 doses Hair Algae – 3-5 doses (depending on species of hair and how bad the infestation is) Turf Algae – 8-20 doses ( again, depending on species and how bad the infestation is) Bryopsis – 6-30 doses ( again, depending on species and how bad the infestation is)
Jeff Jacobson Owner – Underwater Creations, Inc.
TBR Recommends
Vibrant Aquarium Cleaner comes in 8oz and 16oz bottles.
This great product is getting fantastic results and the many owners in the forums are confirming this!
Eliminating Diatoms
Diatoms look like a brown dust covering your sand and rock. They are likely to appear just as your aquarium is finishing its initial cycle and will die off in time. They are fueled by Silicates which can come from rock, sand or some plastics.
Best Ways To Deal With Diatoms
1. Techniques:
— Blasting — Using a turkey baster to blast the rock and sand will keep them suspended in the water which will then be removed by the mechanical filter. This is especially helpful just before you do your regular water changes. Using a gravel/sand vacuum is also a great way to remove a good portion of them during the water change.
— Patience — Diatoms will dissipate once the silicate have been consumed but in the mean time good flow, and good maintenance will help this stage pass within a few weeks. If you add new rock or sand be prepared for a possible bloom again.
2. Algae Eaters:
Nerite snails – Nerita tessellata
Cherith Snails – Cerithium sp.
Margarita Snails – Margarites pupillus
Nassarius Snails – Nassarius sp.
Mexican Turbo Snails – Turbo fluctuosa
Fuzzy Chitons – Acanthopleura
Although Diatoms do not seem to be that appetizing for many aquarium inhabitants, those listed above have been known to feed on any patches they find. They can be hit or miss but worth a try if the Diatoms do not seem to be diminishing on their own.
Diamond Gobies are Great Sand-Sifters!
If the Diatoms are growing on your sand bed, a Diamond Goby (Valenciennea puellaris) will keep your sand pristine by their regular disturbance of the sand as they sift it for food.
3. Products:
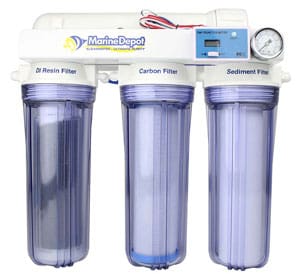
— Good Quality Source Water — Many homes have city or well water that can be high in Silicates which fuel Diatoms. By initially filling and using high-quality RO/DI water for your water changes and top off water you can reduce the number of silicates present in the aquarium.
This may not fully prevent the aquarium from getting Diatoms, but it will certainly speed up the amount of time it takes for them to disappear!
You can find a great selection of RO/DI water filters Here at Amazon.com. This will be one of the best investments you ever make for your aquarium and if you want to know more about these filters, please see my article in the Further Reading section at the end of this post.
— Ultraviolet Sterilizers — Diatoms are not really a plant-based strain of algae, but a single-celled microscopic organism and because of this they can have their DNA mutated by passing them through a UV aquarium filter.
By mutating the DNA it prevents the cell from reproducing and thus helping to reduce the amount of outbreak you see in the aquarium.
You can find out more information about UV Sterilization Filters at the end of this post.
— Vibrant Aquarium Cleaner — According to the manufacturer, 1-2 doses of Vibrant should help clean up the Diatoms. I’ve not been fortunate enough yet to try this on Diatoms as my outbreak was many years before this product release, but it gets great reviews on the forums!
Eliminating Dinoflagellates
This algae is a brown/golden looking mat that can quickly grow over sand and rocks. It will have long hair-like strands coming from it in places.
It can be very difficult to remove because nothing eats this stuff!
Best Ways To Deal With Dinoflagellates
1. Techniques:
— Increasing Flow — Increasing the water flow in your aquarium can help prevent this algae from settling and taking hold. Adding additional wave makers to help prevent flow dead spots can really help.
— Maintenance — If the aquarium maintenance has stopped being as regular as it should be, then getting back into the cleaning routine will help. Regular blasting with a turkey baster, vacuuming of the sand bed, and water changes will help keep this algae to a minimum until it runs its course.
2. Algae Eaters:
This stuff just does not seem to be appetizing to any animal we can put in our reef! The only one suggestion I have is the Diamond Goby. They do not eat it but he constant sifting of the sand will at least keep the sand bed free of this ugly stuff.
3. Products:
— Vibrant Aquarium Cleaner — 2-5 doses of Vibrant should help clean up the Dinos. Again, I’ve not been fortunate enough yet to try this but it gets great reviews and could be a cheaper option to try after the options above.
— Protein Skimmer — If your aquarium is running without a skimmer or a low-quality one, then I highly recommend you upgrade to a well-reviewed, high-quality protein skimmer.
Being one of the most crucial filters for a saltwater aquarium a skimmer will help remove this stuff from your tank once you get it into the water column with regular maintenance.
If you are unsure about Protein Skimmers, what they do, and how to select the right one, check out my article in the Further Reading section.
— Refugium — Refugiums are a device that can be installed on the aquarium where you can grow macroalgae like Cheatomorpha in a controlled way. By growing ‘Cheato’ it outcompetes the Dinos for the same nutrients and helps minimize and prevent longterm reoccurrence of most algae, not just Dinos.
A Typical In-Sump Refugium
Once the Cheato mass becomes too large for the refugium, you just remove half the mass and throw it away. By doing this you have removed many of the nitrates and phosphates the Dinos and other algae are requiring to grow.
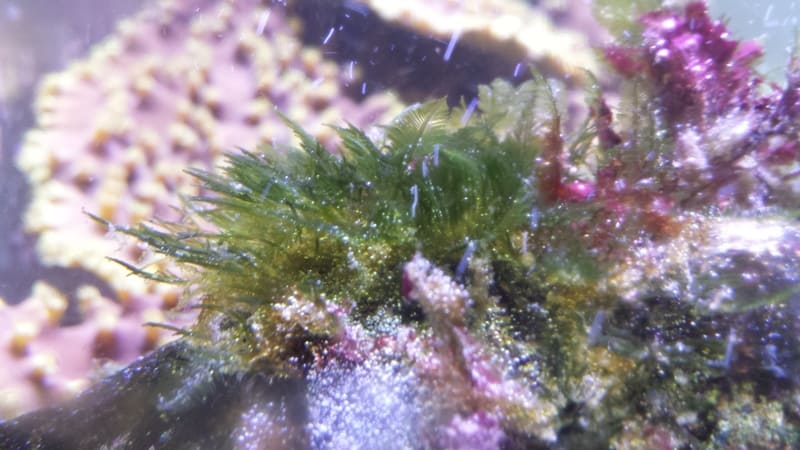
Eliminating Bryopsis Algae
This is a ‘fern-like’ algae and it is one of the most stubborn nuisance algae to remove from your aquarium. It will grow in small clumps to begin with but then spreads. It usually enters our aquariums as a hitchhiker on Live Rock or Frag Plugs.
This is an algae I had been battling on and off for years. It just came and went for no apparent reason. It is not unsightly, but it can begin to take up coral real estate if left to grow.
Best Ways To Deal With Bryopsis Algae
1. Techniques: –Picking–
The only way to stay ontop of this pest during treatment is to manually remove as much of it as you can with your fingers and throw it in the garbage. You will not be able to get it all as the root will remain and allow it to grow again and there are the areas that you cannot physically get to.
By manually removing as much as you can it allows the chemical treatments to work on less of the Bryopsis and hopefully eradicate it faster.
2. Algae Eaters:
Nothing seems to touch this stuff! I mean nothing! I’ve tried and researched what other aquariums have tried and some livestock may munch on it for a few days and the not touch it again. Very annoying!
3. Products:
— Vibrant — Many aquarists are giving Vibrant great reviews on ridding their aquarium of Bryopisis. Again, I have not had the opportunity to try this product yet as all my nuisance algae blooms were battled for a long time many years ago – Typical!
I would defiantly give this a try before using any of the other methods listed below.
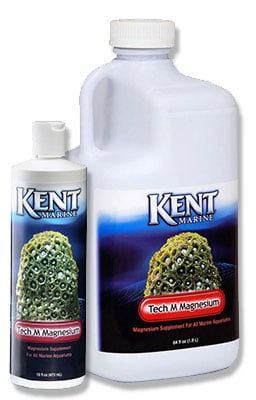
— Kent Tech-M Magnesium — This is how managed to overcome my Bryopsis Algae, but it took forever!
Keeping high levels of Magnesium (over 1600ppm) in the aquarium using only Kent Tech-M Magnesium seems to slowly melt this stuff away. There apparently seems to be an ingredient in Kent Tech-M that works on the Bryopsis. Many aquarists have tried other magnesium products and nothing happens.
This technique/product requires persistence but does work – Oh and don’t run out of Tech-M halfway through or the Bryopsis comes back! I found that out the hard way!
— Fluconazole — Fluconazole is a treatment intended for fish infections and diseases but it has been found to be a great treatment for the eradication of Bryopsis. Fluconazole works by blocking the cellular paths within the cells of the Bryopsis plant.
By blocking these paths, it impedes the distribution of a sterol that is similar to Cholesterol in humans. Without this sterol, the cell walls break down and the plant dies.
— Hydrogen Peroxide — The underdog of fixing many problems that most people never know about. Hydrogen Peroxide is a true giant of the things it can do and one of those is beating Bryopsis in our aquariums.
The only drawback to using this method is for it to truly work you need to be able to remove the infested rock from your aquarium. This can be a quick, cheap fix if you have a nano aquarium or a smaller aquarium with a minimalist aquascape but for those of you with large aquascapes or rocks cemented together, this treatment is probably one to skip.
For more detailed information on Byropsis and how to beat it using all these methods, I wrote an article specifically on it. You can find it here:
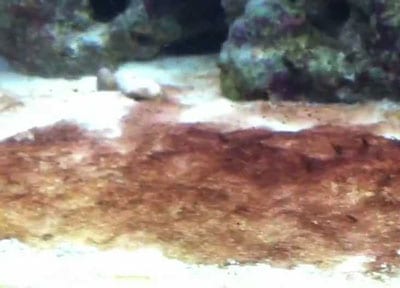
Probably one of the most common pests that every aquarist will come across – Red Slime Algae or Cyano Bacteria as commonly known.
It gets its name from the slimy appearance it creates over everything. Sand, rocks, corals!
Cyano as it is commonly referred to, is actually a bacteria rather than an algea, but because of that it makes it fairly easy to treat.
It can show up as dark red, purple, dark brown, and even black, it really all depends on the lighting you have. The Cyanobacteria cells will reach a point where the aquarium is just right to allow the bacteria to bloom.
If you let the bacteria run its course it will consume all of its food source and die out – Providing you don’t go adding more detritus, phosphate, or nitrates into your aquarium.
Best Ways To Deal With Red Slime Algae
1. Techniques:
— Improving Flow — Areas of low flow in the aquarium can allow for Cyano to take hold. It finds it hard to attach to rocks and sand if your tank has a high water flow. By changing the positioning of your powerheads and wavemakers, or even adding an additional pump you can really help to remove this stuff.
— Reducing Its Food — Cyano loves nitrates and phosphates and the main causes for high levels of these elements are:
Over feeding
Over stocking
Lack of maintenance
Poor source water
Low quality foods
Irregular water changes
By addressing these issues first you will not only help prevent the spread of Cyano but many other nuisance algae too.
— Vacuuming — Just before doing your regular water changes vacuuming the sand bed and blasting the rocks with a turkey nature will allow the cyano to be removed or blown into the water column for the filtration to remove it or be taken out during the water change.
I find a battery-operated gravel vacuum can work well for sucking up this stuff into a mesh bag/screen for removal in between water changes can help, especially if you hate the unsightly look it gives your aquarium
Another pest that nothing seems to touch! Being one of the most common pests it would be awesome if there was a fish or snail that would eat it but I have not found anything that goes near it!
From my research, some snails MAY nibble on it from time to time but they do nothing to help eradicate this stuff. Nothing I have in my tank even looks at it!
3. Products:
— Chemiclean — The only brand I have personally tried and had success with has been Chemiclean by Boyd Enterprises. Some Cyanobacteria removal products use antibiotics to kill the Cyanobacteria cells, but this can also kill your helpful Nitrifying Bacteria cells too!
Chemiclean is not an antibiotic-based treatment and will not harm other cells in your aquarium. This, along with the track record and great reviews were the reasons I selected to use it – And it worked very well!
Be sure to read the directions carefully and follow them to the letter as using Chemiclean will send your Protein Skimmer nuts and cause it to overflow. It could also cause a drop in your oxygen level in the aquarium water. A simple air pump and airstone will help prevent this drop.
This is one of most commonly used products to treat Cyano and a little goes a very long way!
— Vibrant — We are starting to see a common product appearing in these sections and before long it may be the go-to product for ANY algae/bacteria bloom in the aquarium!
1-5 doses is all that Jeff is estimating to get Cyano cleared up so I will only find out if a get another outbreak then I can test his statements.
One to try for sure though, and if it does nothing in your aquarium, Chemiclean should always work!
Red Slime Algae was another pest that needed its own in-depth article with instructions on how to deal with it. You can find my article here:
Green algae bubbles that appear singularly or in mass in your aquarium. They can be a battle to overcome as they release spores that reproduce when they burst.
These have been my nemesis but were slowly beaten off with a variety of methods!
Best Ways To Deal With Bubble Algae
1. Techniques:
— Manual Removal — They can be tough to remove by people without nails or fat fingers like myself. The trick is to grab the bubble from its stalk and pick it off without it bursting. This can be an endless routine as it seems to grow back as fast as you can pick it.
One thing to be cautious of with Bubble Algae – To which I almost found out the hard way, is that it can impede water flow if allowed to grow unnoticed in overflows or return chutes/pipes of Hang-On-Back equipment!
Bubble Algae in my Reef!
— Diligent Inspection — Coming into your aquarium as a hitchhiker on a coral frag plug is by far the most common way it enters our tanks. Very careful inspection, dipping and if possible, frag transplant to a clean plug, is the only way to minimize the chance of it getting in.
I thought I was diligent enough but apparently not as this was the only way it could have entered my reef! My inspection and coral quarantine methods soon changed!
2. Algae Eaters:
For small Aquariums:
Mithrax/Emerald Crabs – Mithrax sculptus (Get the females as these seem more attentive)
For larger Aquariums over 75 gallons:
Foxface Rabbitfish – Siganus vulpinus
Vlamingi Tang – Naso vlamingii
Convict Tang – Acanthurus triostegus
Desjardinii Sailfin Tang – Zebrasoma desjardinii
Achilles Tang – Acanthurus achilles
Powder Brown Tang – Acanthurus japonicus
Purple Tang – Zebrasoma xanthurum
Naso Tang – Naso Elegans
Sohal Tang – Acanthurus sohal
Some of the Tangs listed above require very large aquariums so please ensure your tank is big enough for your intended purchase before buying. You can see the recommended tank size for each Tang Here at Saltwaterfish.com
Foxface Rabbitfish – Bubble Algae Machine!
Out of the animals listed above, I personally found great success with a couple of female Emerald Crabs and the Foxface Rabbitfish. These things mowed down my Bubble algae in weeks once I finally found they were good to try, and it’s never returned!
3. Products:
— Vibrant — Well no surprises here! 3-8 doses should get it gone. Man, I want to get an algae outbreak now to see if this is as good as everyone says it is! It’s surely going to be in the maintenance bottle section of my shelves ready for when some pest shows up!
Because of my seemingly endless battle with Bubble Algae I wanted to pass on the animals and experiences I had learned to others so I wrote its own article. You can find my article here:
Now that we have covered most of the common nuisance algae there are several things we need to understand about algae.
You will always get algae in your aquarium and that’s just part of the ecosystem, but its how you control and maintain it is the key to an algae-reduced reef tank. Not counting the pests like Diatoms and Cyano, algae is a plant-based organism that requires light and nutrients to flourish. Nitrates and Phosphates are two of the biggest nutrients that can cause you to have sudden outbreaks in your seemingly clean aquarium.
There are many ways that our aquariums get increasing levels of both nitrates and phosphates and it is up to us as the owner to address those problems if you ever want to stop having outbreaks. Two of the most common ways that algae seems to bloom are :
Poor source water that is full of algae rich nutrients to fuel any algae hiding in small numbers
Algae spores hitchhiking into our aquarium on Live Rock or Coral Frag Plugs that are not carefully inspected before insertion.
Before you start purchasing animals or products to help you remove the algae, first you need to try and reduce the causes of it in the first place to prevent it coming back after the eradication has taken place.
These two articles I wrote should be your first point of call on addressing each nutrient:
Unfortunately, you are going to get algae, and being prepared with the knowledge on how to prevent, minimize and tackle each pest will help you stock your aquarium and create a maintenance routine that will ensure the chances of serious infestations are minimal.
I have always tried to use a natural way to remove the pest before adding a chemical to my tank, but sometimes chemical warfare is the only way. I think for many of us a bottle of Vibrant Aquarium Cleaner sitting on the shelf will be a great treatment to have to fight the pest before it has a chance to take hold and cause weeks if not months of persistent work to overcome.
Battles with algae will be overcome and your aquarium will look beautiful once again, just stick at it and be sure to diligently inspect ANYTHING before it goes into your tank!
If you wish to get a copy of my Recommended Aquarium Maintenance Schedule to help you plan a great maintenance routine then check out these guides right here:
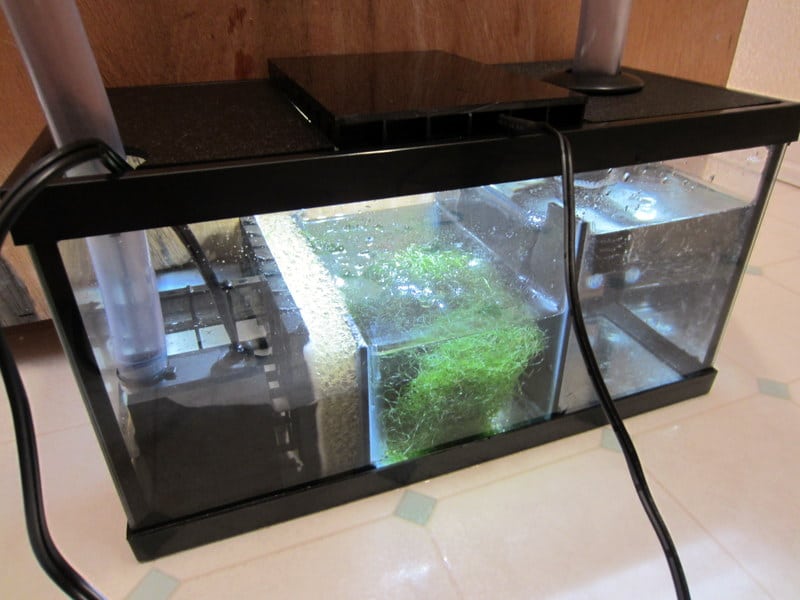
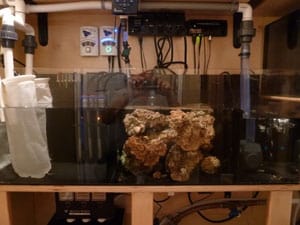
At some point during your research into aquariums, this thing called a ‘Sump’ may have kept popping up and I remember thinking ‘What the heck is that‘ when I first heard about them. My idea of a sump was something that sits under my house to stop the basement flooding! How did that have any connection to an aquarium?
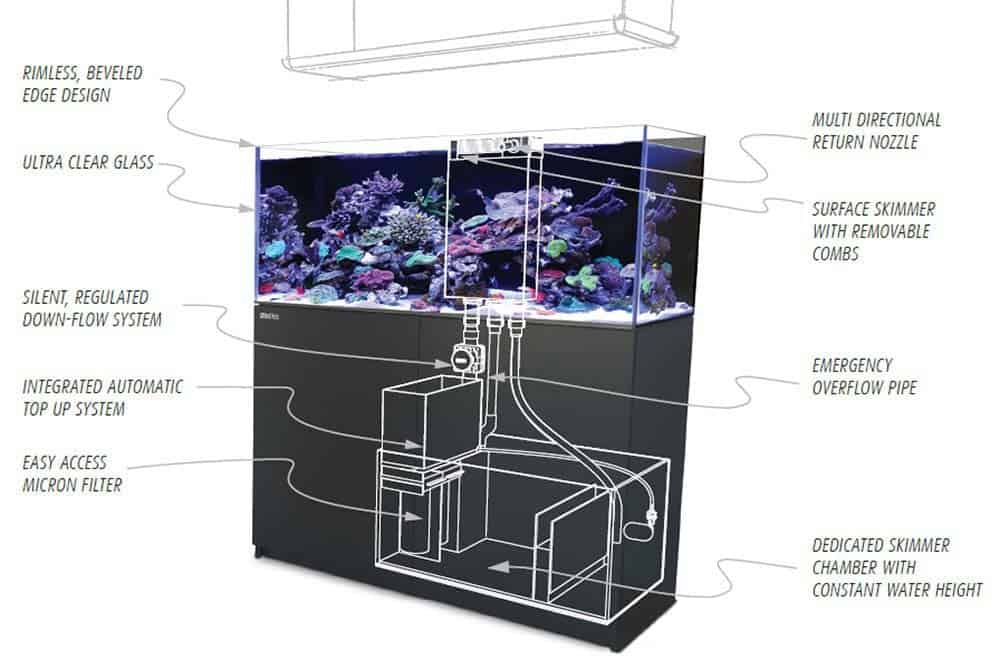
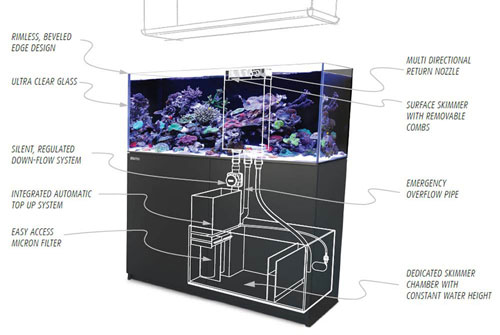
An aquarium sump is an additional tank or vessel that is usually installed in the aquarium stand. Water moves from the aquarium to the sump and back. Sumps provide additional space for installing filtration equipment out of sight and increase water volume to help maintain water stability.
When selecting your next aquarium a sump can be a very beneficial addition to both a freshwater and saltwater tank so let’s go and look at the sump and discuss why you should really look at getting a tank with one!
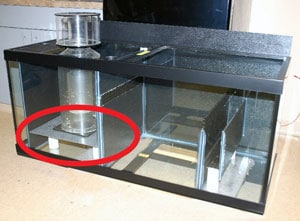
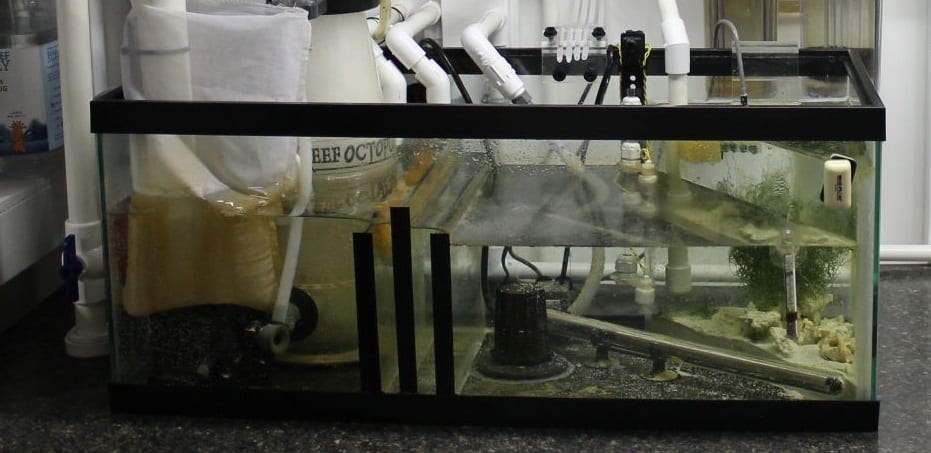
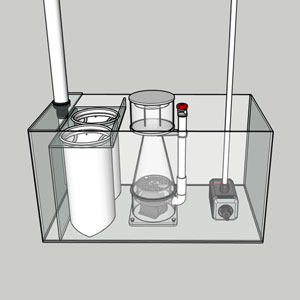
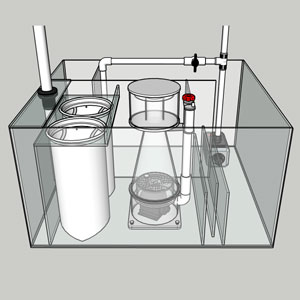
In its most basic form, a sump is an additional tank, vessel, or container that sits outside of the aquarium. The sump can be a simple single chamber container or a purpose-built tank with multiple chambers that each have a specific purpose.
A Typical Sump Installation
The main benefits to adding a sump to your aquarium are:
Increased water volume
Adding a 20g gallon sump to a 50gal aquarium has just increased the total water volume by 40%! This can really help keep water parameters more stable.
Hides Equipment
There is nothing worse than seeing a beautiful aquarium but then be distracted by cables, pipes, and gadgets hanging off every wall in the tank.
Larger Equipment
Filtration equipment comes in many sizes and when you are limited to what size filter you can physically fit in/on the aquarium, it can shrink the product selection you have to choose from. Having a sump allows you a greater choice of filtration equipment.
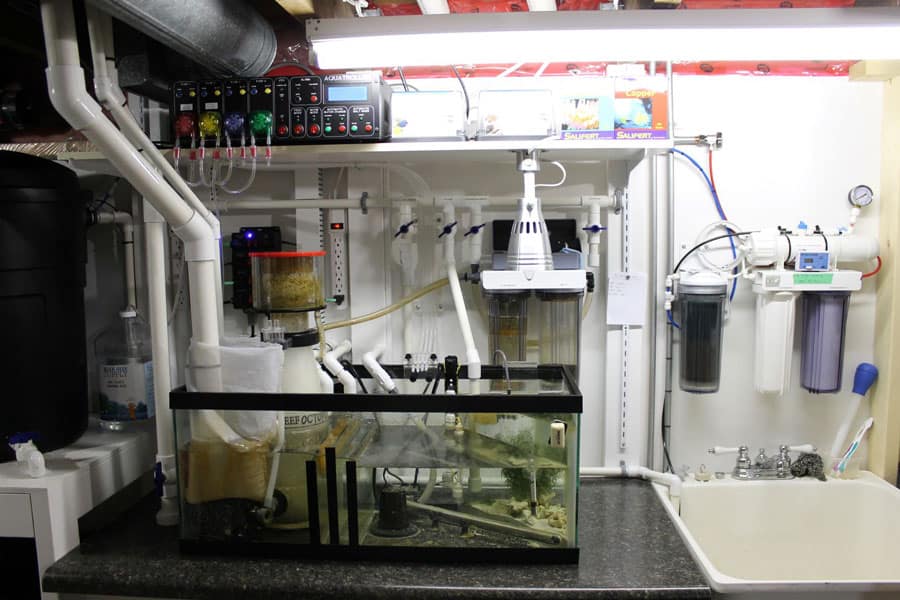
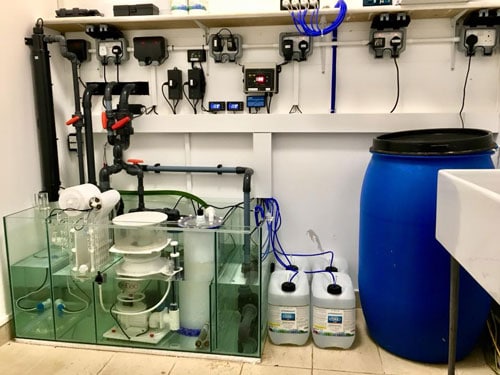
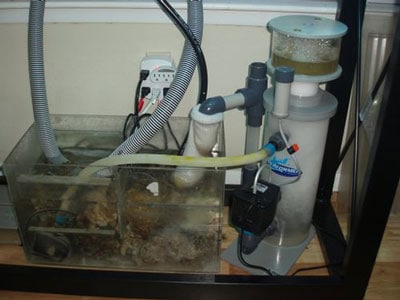
My Saltwater Aquarium Sump – Installed In My Basement
More Filtration
Having a sump allows you more space to add additional filter media to help control parameters like nitrates and phosphates. Chemical media can be placed into mesh bags or media reactors that can hang on the side of the sump.
Adding material to increase bacteria surface areas like MarinePure(Amazon.com) blocks can dramatically increase the biological load (bioload) the aquarium can now support = More livestock.
Algae Buster
A sump allows you to install devices like Refugiums or Algae Turf Scrubbers to grow the algae out of sight rather than it growing all over your main aquarium.
To help you understand more about what a sump is you can find a great selection of varying sized sumps to reference while you read through this article Here at Aquarium Specialty.com
So as you can see a sump may not sound like much at first glance but the benefits far outweigh the cons and if you have not bought an aquarium yet or are thinking of an upgrade then an aquarium with a sump will be one of the best decisions you will make in this hobby!
How Do Aquarium Sumps Work?
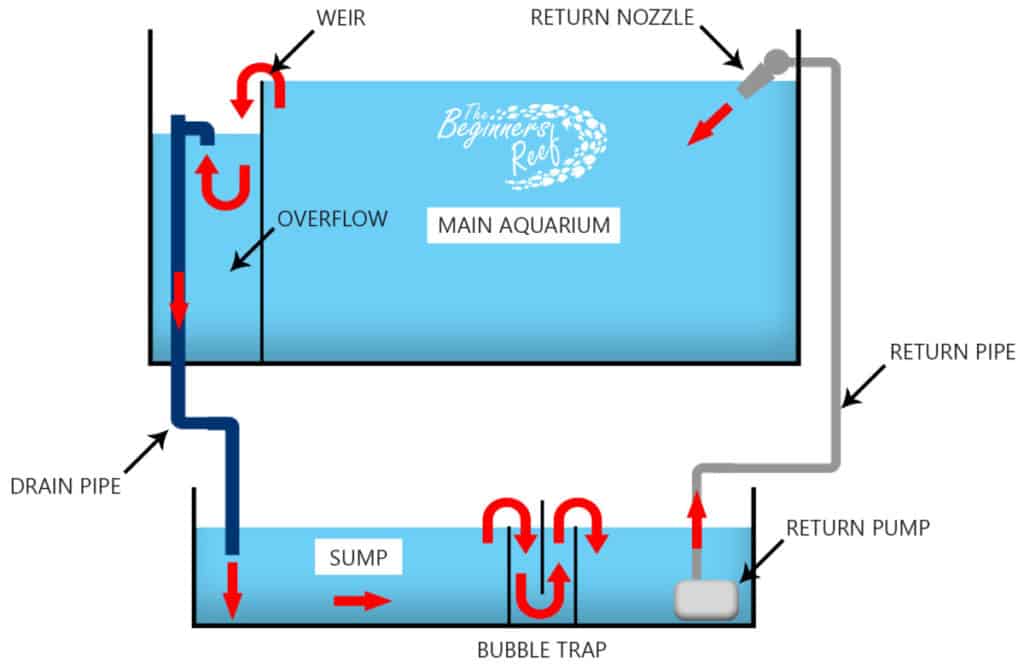
Sumps work by having water drain down from the main aquarium via a weir and overflow section and into the sump. The water then passes through the filtration in the sump before being pumped back up to the main aquarium.
The circulation of water never stops providing the ‘Return Pump’ is operating. As the water gets pumped back into the main aquarium, it passes through a weir and drops into the overflow section. This is what keeps the water level in the main aquarium constant. It then drains into the sump and is then pumped back to the main aquarium.
Think of this just like the overflow hole you see in every bathroom sink. When the water gets too high in the sink, it goes through the hole and down the drain pipe.
This is exactly how the aquarium/sump system works. But instead of the water flowing out to the sewage treatment plant, it flows into a vessel under the sink, gets filtered, and pumped back out of the faucet.
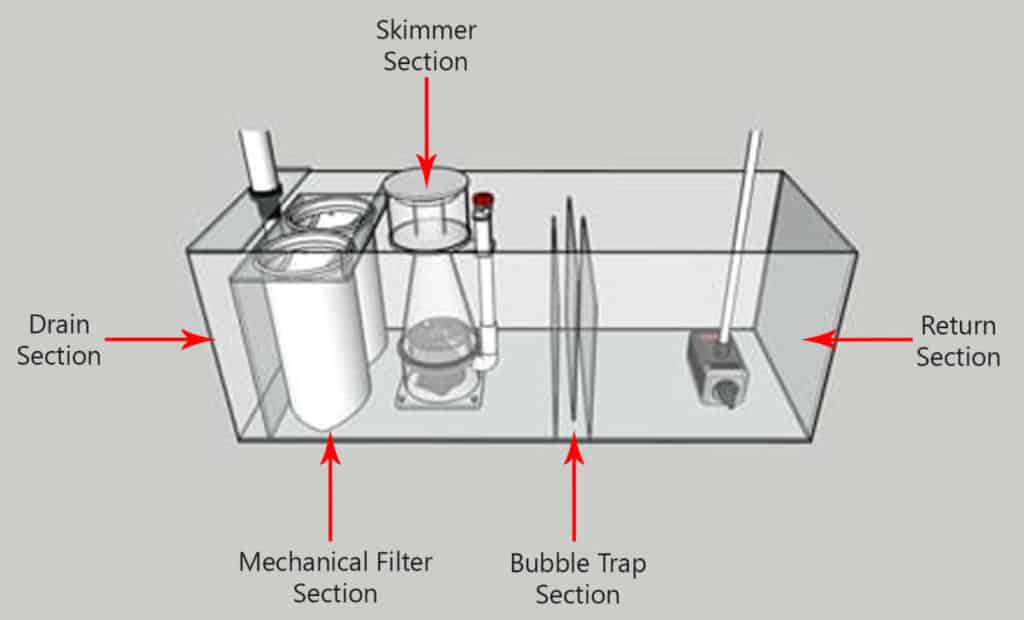
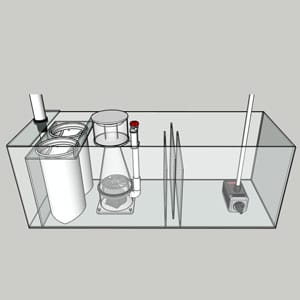
Sumps can be as basic as a bare glass tank or can be custom machined from acrylic to do whatever the owner wishes but most sumps have some common sections within them to help improve the efficiency of how the sump works.
Drain Section
This first section is where the water enters the sump from the main aquarium. There can be just a single drain pipe or multiple drain pipes collect in this area if the aquarium has 2 or 3 overflow sections.
It can either be its own covered section to prevent water splashing everywhere and creating salt buildup, or it is usually combined with the next section – The Mechanical Filter Section.
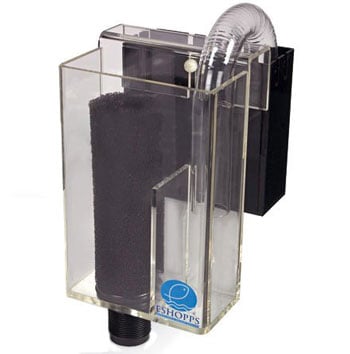
Mechanical Filter Section
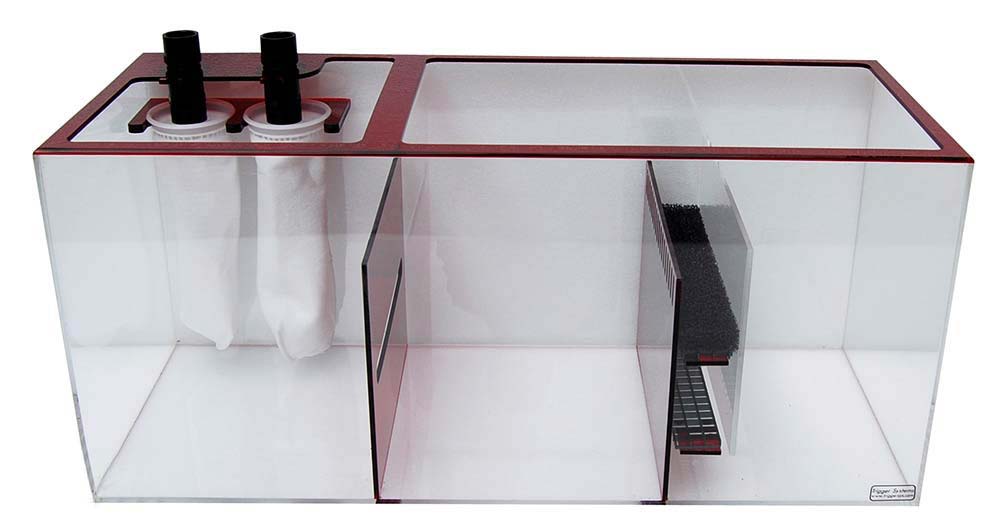
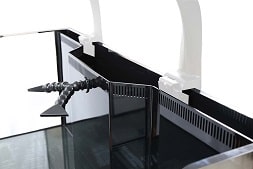
The first part of the filtration that the water meets in the sump is the mechanical filters. These can be socks made of filter material, sponge pads, mats made of filter floss, or a relatively new device that is taking the market by storm – The Fleece Roller or Roller Mats as they are known.
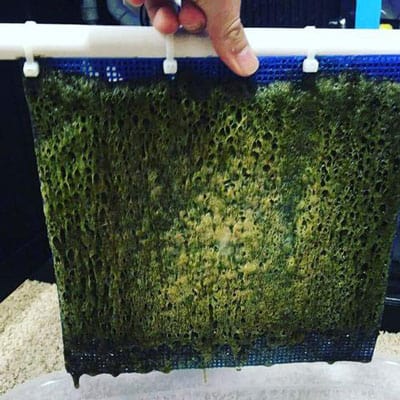
Filter Socks Installed In A Sump
The main job of the mechanical filter is to catch the large particulate matter suspended in the water so it can be removed before it gets chance to break down and decay.
Skimmer Section
This section is more applicable to saltwater aquariums and is where the Protein Skimmer is placed. Once the large particles have been removed by the mechanical filter, the protein skimmer gets to remove the Dissolved Organic Compounds from the water.
Protein skimmers have a recommended water height that they must sit in and some sumps come with an adjustable wall on the Bubble Trap to allow the owner to set the water level height in the skimmer section.
For those sumps that are unable to set the water level height, most aquarists make feet or a shelf to sit the protein skimmer on so it sits at the optimum recommended height.
Protein Skimmer sitting on a Stand
Bubble Trap
Bubbles are a big nemesis in saltwater aquariums. They are very popular in freshwater aquariums but we need to prevent them as much as possible in saltwater. As the water drains into the sump and goes through the protein skimmer it becomes full of tiny microscopic bubbles.
Microbubbles can distress fish and coral and because of the strong lighting in a saltwater aquarium, they really show up in the water column. Aquarists want their water to be as pristine & clear as possible and a bubble trap is a great way to help achieve this.
A bubble trap is a series of 3 baffles that trap bubbles and release them from the water. As the water cascades over the first baffle, its bubbles are released and travel upwards. The water then flows down and under the second baffle with virtually no bubbles in it. Any bubbles left are released as the water travels up and over the third baffle.
The Bubble Trap on my DIY Sump
This simple device prevents any bubbles being sucked into the return pump and blown into the main aquarium.
Return Section
This section is where the Return Pump is located. The job of the return pump is to send the water back up to the main aquarium so more water can pass into the overflow and return to the sump to pass through the filters.
Pumps can either be a submersible type and sit within the water of this section or be an external pump and draw the water from this section.
Return Pump in Sump – Right Hand Section
The important part every aquarist needs to know is that this is the section where the water level will decrease as the aquarium water evaporates. If left unnoticed the water would drop until the pump runs dry which will cause the pump to fail.
The other major problem with water evaporating is that it leaves the salt behind, so as more water evaporates the remaining water will become saltier as the ratio of water to salt reduces.
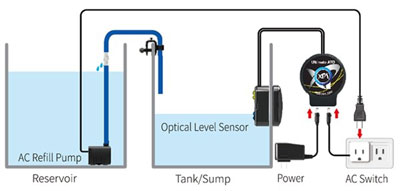
To overcome these two problems one of the first upgrades an aquarist will purchase is an Automatic Top Off System. You can find out all you need to know about ATO systems in my article: What Is An Aquarium Auto Top Off?
Additional Sump Sections
If you have space where the sump is going to sit or you wish to build your own custom DIY sump then there are two additional sections you can install to make the ultimate sump:
1. Refugium Section
A refugium is an area dedicated to growing macroalgae and allowing Copepods to grow without being eaten. By growing macroalgae in this area, you can dramatically reduce the amount of phosphate and nitrates in your aquarium allowing for cleaner and healthier water.
For a far more in-depth look at Refugiums please take a look at my article on them: What Is A Refugium?
2. ATO Reservoir
In the return section of the sump, I mentioned how this is where evaporation occurs, and to keep stable water parameters we can install an Automatic Top Off system to replenish the evaporation with freshwater.
This freshwater needs to come from somewhere and usually most people fill a 5-gallon pail with freshwater every week to keep the system working. Having a reservoir built into the sump keeps everything neat and tidy.
A Basic ATO System
Are There Different Types of Aquarium Sump Design?
There are so many designs of sump available that you will have no problem finding one that fits your available area or can have all the sections you need. If you are unable to find one then you can build your own like I did or have one custom made.
These next designs will give you the basic layouts of the most common sumps available.
The Most Basic Sump Design
The mechanical filter, skimmer section & return sections are all together – No baffles or bubble trap.
This is the simplest option but provides no way of removing any bubbles or keeping the water level a constant height due to evaporation of the whole section.
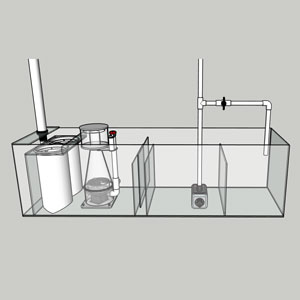
The Most Popular Sump Design
Mechanical filter section and skimmer section in one area and a bubble trap with a return section.
This allows the skimmer section can have a constant water height and the return section can be bubble free.
3 simple glass or acrylic pieces are all that is required to improve on the Basic Sump Design
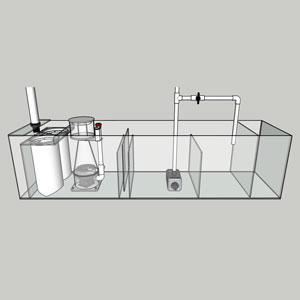
The Most Efficient Sump Design
Installing a sump with a built-in Refugium is a great choice for those who can fit it. By Tee-ing off the return pipe the owner can install a valve to set the flow rate through the Refugium to allow the mass of Macroalgae to turn.
The Refugium water then cascades over a dividing baffle and back into the return section.
The Ultimate Sump Design
This design of sump adds an area for a ATO reservoir. Having 5-10 gallons of freshwater available for the system means this area only has to be refilled once a week (depending on the tanks evaporation rate).
A solenoid valve on a timer or toilet-style float valve can allow for this section to automatically remain filled too!
The Compact Sump Design
For those owners that have a Cube-Shaped aquarium or are tight on space, having a compact sump allows for all the efficiency of the larger sumps but in a more compact space.
These require a little more careful equipment selection to be able to fit in the sections and maintenance can be a little tighter to work on, but overall a great type of sump!
Where Do You Install an Aquarium Sump?
This section is broken down into two parts:
The overflow part of the aquarium/sump installation
The physical location of the sump itself
The Aquarium Overflow
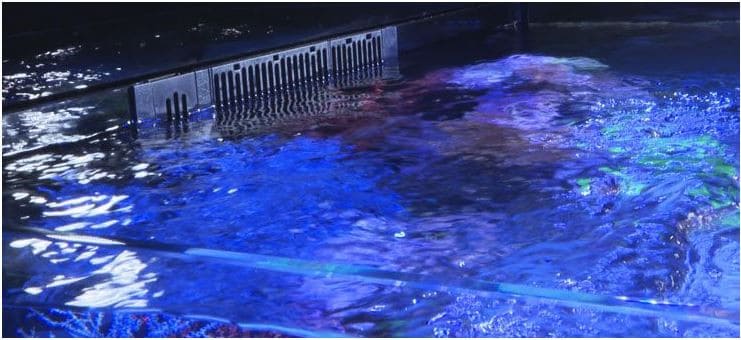
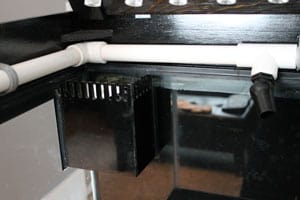
If you have a sump, you need a way to get the water from the display tank down to the sump. This is where a weir and an overflow come in.
The weir acts as a barrier to setting how high the water level is in the main aquarium. It usually contains teeth or grooves cut into an acrylic sheet to prevent snails, crabs, and fish getting into the overflow section.
A Typical Weir or Surface Skimmer
The weir also acts as a surface skimmer to pull any junk or debris floating on the water surface into the overflow to be taken to the filtration.
The overflow section is where the water collects after cascading over the weir before entering the drainpipe to run into the sump.
I have seen and worked on many of the popular types and I’m going to guide you through each type:
Reef Ready – Drilled by Manufacturer
You can buy tanks pre-drilled from the manufacturer with a Drain Pipe, Return Pipe, and Overflow pre-installed. These are very good tanks and are very popular. Reasonably priced too.
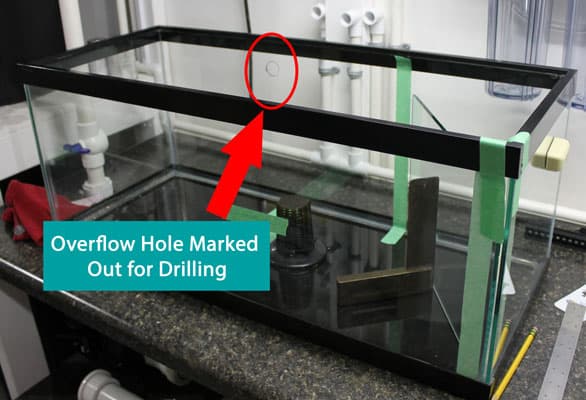
Internal Overflow – Drilled by Owner/Store
This type of overflow is very popular with the DIY’er as it allows you to custom craft your tank to suit your home and set up. An internal overflow uses a box on the inside of the aquarium with a hole or holes drilled through the side pane to either a plumbing bulkhead (Durso Method) or another box with which several drain pipes can be fitted (Herbie & Bean-Animal Methods).
‘Ghost’ Internal Overflow
The Ghost Overflows are a great choice as they are very low profile with the minimum amount of box on the inside of the aquarium. They do disappear well into the back/side walls and will be my choice on my next aquarium. They come in various sizes and allow for multiple drain pipes making them silent in operation (Bean-Animal Method).
External Overflow – Custom Tanks
This type of overflow is also very popular especially if you are having your tank custom built. This overflow has the side/back pane notched out at the top to provide the exit for the water to fall into a collection box on the back of the aquarium.
A black acrylic panel is then placed over the pane with teeth machined into it to keep critters out of the overflow. The only part of this overflow you can see from the front is the teeth on the weir.
These are the best overflow in my opinion but cost the most because the glass panel has to be machined and a glass box constructed on the outside of the aquarium. You are able to fit any of the 3 drain styles into it (Durso, Herbie & Bean-Animal) making it super silent.
If you are having your aquarium custom built this is the overflow to pick!
Siphon Overflow!
I have left this overflow until last because, in my opinion, they can create so many headaches. They are for tanks that are not drilled. They provide a means of moving water out of the display tank and down to the sump by using a siphon.
They siphon water over the rim of the aquarium, collect it in a box and send it down the connected drain pipe.
I cannot advise you enough to stay away from these overflows. Just have your tank drilled or buy one drilled. They are easy to drill!
This type of overflow has caused me more problems on clients’ tanks because when you get a power outage, the siphon breaks, and sometimes the siphon starts on power-up, and sometimes it does not.
You can buy a small pump that sits on top to suck water into the siphon, but it’s just a bandaid.
Many a tank has been flooded because the power comes back on, the return pump starts, but the siphon does not. The return pump then empties the contents of the sump into the display tank and it overflows!
Save yourself the headache and get a drilled tank if you want a sump or an All-in-One Aquarium.
The Sump Location
There are 3 main locations that most aquarists install their sumps in their homes.
Within the Aquarium Stand
Below the Aquarium in the Basement
Behind the Aquarium in a Separate Room
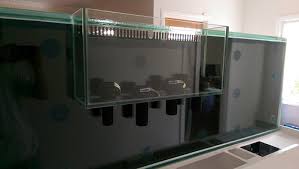
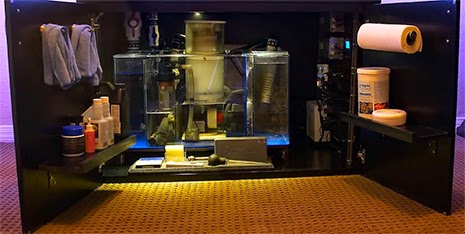
1. Sump Within the Aquarium Stand
This is by far the most popular location for many aquarists due to the ease of plumbing and it is easily hidden away once the stand doors are closed.
There are some very, very nice sump installations in this world, and I’m surprised at just how much equipment can get crammed into a stand.
This is a typical way to install a sump in your system.
The convenience of this location is great but it comes with a few drawbacks:
Limited space to mount additional equipment
Electrical and Saltwater are within very close proximity to one another
Difficult to move equipment in and out for cleaning and maintenance
You are on your knees leaning into the stand – Trust me it hurts after a while!
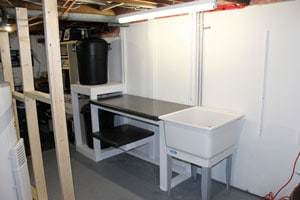
2. Sump Below the Aquarium in the Basement
This is a great option if your home and budget allow for it. It doesn’t cost that much more, but the benefits of having space and everything mounted at a nice working height makes a huge difference in doing maintenance.
Before My Sump Installation
After My Sump Installation
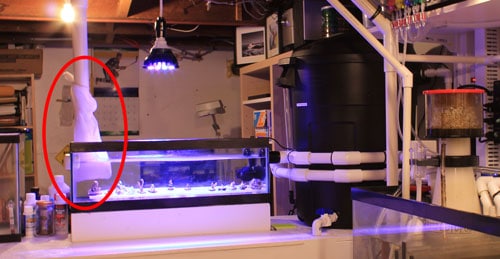
This is my sump installation in my basement. I was fortunate enough to have access to the location directly under my aquarium to build my ‘Fish Area’. This allowed me great access and the room to expand and install a Quarantine Tank and a Frag Tank in the early years after initial installation.
The only downside to this was I had to have a large return pump that was expensive, to push the water back up the 13ft to the top of my Display Tank.
3. Sump Behind the Aquarium in a Separate Room
If your home and budget can accommodate this it is by far one of the best installation methods you can do for the ultimate reef tank setup!
By placing the sump in a room behind the aquarium you have a clean slate on how to design the layout, the space to add as much equipment as you like, and room to add equipment later as your skills and tank progress.
The other good part about this is you are not pumping water up high, so the head pressure is greatly reduced allowing you to use a lower wattage return pump.
From a maintenance point of view this method is by far the best if your partner will allow you to convert a room into your ‘Nerd Room’! Having access to a sink and being able to plumb in your water storage tanks is worth its weight in gold!
This may seem daunting but once you have spent some time on your knees under the stand you will be planning your ‘Fish Room’ for your next build!
What Is The Recommended Flow Rate Through An Aquarium Sump?
The main purpose of the sump as we described earlier is to house equipment and provide greater water volume. The two main pieces of equipment that are installed in most sumps are the Protein Skimmer and Heater/s. The idea is to find a return pump that matches the recommended flow rate of the protein skimmer.
The protein skimmer will have an optimum flow rate that it was designed for and most aquarists recommend anywhere from 3x – 5x your tank capacity through your sump every hour.
For Example: My aquarium is 75 gallons so 3x volume per hour would be 75×3=225 gallons/hour (GPH) flow rate. My protein skimmer is designed to operate around 200GPH so here is where I began the search for which return pump to use.
My return pump gives around 800GPH at 12ft head height which is perfect for my setup because my sump is located in the basement below my aquarium. I have a manifold running additional equipment so I’m able to throttle down my return to the tank with a valve so that the flow through the sump is around the 200GPH rate.
Do not get confused with the sump flow rate and display tank flow rate. Your corals will need massive amounts of flow rate, but this is created using wavemakers or powerheads.
All your return pump is for, is to set the flow rate through your sump and return the water back to the display tank.
By having a slow flow rate through your sump, your water will get maximum contact time with the Protein Skimmer and your Heaters/Chiller and allow them to operate at their maximum efficiency.
Are There Any Aquarium Sump Installation Precautions?
The two main areas I have seen cause problems with new sump installations fall under one of the following categories. By being aware of these precautions to take you can dramatically increase the chances of a mishap occurring with a new sump:
Flooding Prevention
Electrical Safety
Read on to find out how to keep safe and prevent a huge mess!
Flooding Prevention
Being an aquarium owner, one of the biggest fears many people have is flooding, especially with saltwater. If you have a flood with saltwater the damage can be huge! Not only does the water create problems but once it dries the salt is left behind making a big job, even bigger.
Making your aquarium and sump as flood-proof as possible is an absolute must, so here are some things to be aware of and steps to take to prevent a flood:
Power Outages
Once you have a sump installed into your system you have to make sure the operating water level in your sump is set up correctly.
During a power outage, the water that is in the pipe going up to the tank from the return pump is going to drain back down into the sump. If your display tank is considerably higher than the sump and you have a large diameter pipe, you could have a lot of water draining back down.
Many people use a Non-Return Valve on the return pump to prevent this, but if that fails and your sump level is not right, you will flood.
To set up your sumps operating water level I suggest this:
Fill your sump to 50% full with the return pump running.
Disconnect the power to the pump and let the water back drain into the sump.
Measure how much the water level in your sump rises. This now shows you how much gap you need to leave at the top. eg: Back Drain amount rose sump water level by 4″
Set normal operating water level to 6-7″ below the top of your sump. ie: Water changes should refill back to this level and have your ATO set at this level.
Draw a line on the sump glass at the normal operating water level. This allows for quick glances to see sump is at the correct level and your ATO is working properly.
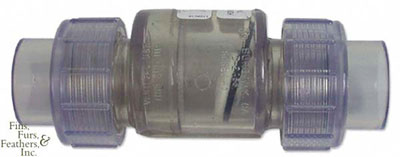
Non-Return or Check Valves
If you have a strong desire to use a non-return valve that is OK. Just make sure you have your water level set correctly, or if you are unable to do the above step because too much Back Drain water comes in, you then have to use an NRV (Non-Return Valve) if you cannot fit a bigger sump.
When you are selecting an NRV I would suggest using the valves that have a flapper valve inside of them, rather than a spring-loaded valve.
The flapper valves take a lot less pressure to open compared to the spring-loaded valves and this will give you more flow out to your display tank. You don’t want to be spending money on a good return pump and have all its pressure taken away because of a valve.
The other tip I recommend is spending a little extra money and buy the see-through valves with the union connections on each end. This way you can see if they are working correctly and it also allows you to see when it needs cleaning.
You will see an arrow molded into the side of the NRV. Make sure this is Pointing Away from your return pump!
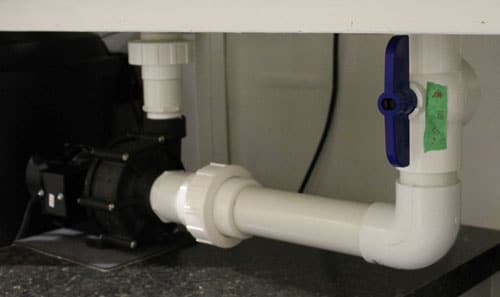
Next, install a ball valve between your NRV and Display tank, this way you can isolate the water in the pipe above and easily remove the valve for cleaning.
My Return Pump With Ball Valve and Unions for Easy Cleaning
Cleaning is the key to Non-Return Valves!
Improperly Sealed Aquarium Overflow
I have seen a few floors flooded due to an improperly sealed overflow in the display tank. Once the water drains out of the overflow in a power outage, the water in the display tank should not leak or creep into the overflow.
Be sure to always leak check your aquarium AND overflow (outdoors) for several hours before you properly install your aquarium, to make sure it is all watertight where it needs to be.
Having a small leak into the overflow will continue to drain down into the sump. Even if you have set up your sumps water level correctly, a slow leak over 8-10 hours will overfill your sump and flood the floor.
A Typical Internal Overflow
Leak Check Before Installation Saves Flooding!
Clogged Filter Socks or Filter Floss
In the early weeks of your new aquarium be sure to keep an eye on how quickly your mechanical filter socks/floss begin to clog up with detritus.
Keep plenty of spare socks or floss on hand to replace your clogged ones regularly. Once this filter becomes clogged it makes it harder for the water to pass through it.
As your livestock increase, your filters may clog faster, so keep an eye on them.
Depending on the design of your sump you may not have a filter floss or sock water bypass in there to prevent a flood. I change my socks weekly, then have some filter floss in my bubble trap. I only place floss in 3/4 of the width of the bubble trap to allow water to by-pass if it becomes too clogged.
My Frag Tank Filter Sock Clogged Once – Luckily I Caught It Early!
Ensure your filter socks are not near the edge of your sump, so if the sock/s do overflow, they dump the water into your sump and not out over the edge.
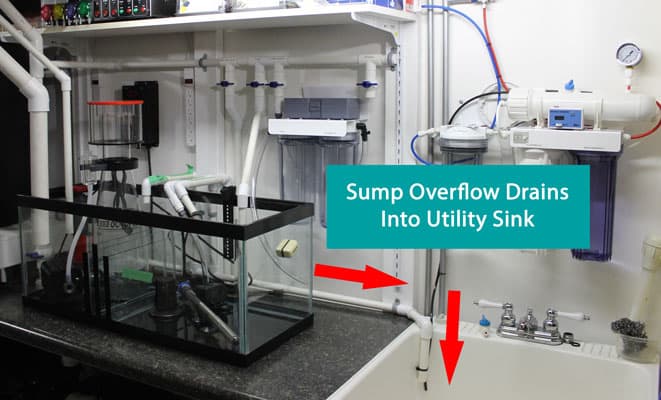
Sump Overflow Drain
If you can do this it may save your Butt! When you design your system you should always be looking at simple ways to cover your rear end. Having an overflow drain in your sump is one of them if your location allows.
In my sump, I drilled and installed a 1/2″ bulkhead about 1″ from the top of my sump, then piped this into my house drain. This saved me from a flood when I found out my aquarium overflow developed a pinhole leak and we had a power outage 2 years after installation.
This is going to be a tough job for many people who have their sump located in the stand, and there is no basement access below or some form of house drain nearby, but lower than the Overflow hole in the sump, but if you can, do it! It is worth it!
Think of the Sump Overflow as an overflow hole in a typical sink.
Water Alarms
There are two types I want to include here:
High Water Level Alarm
Leak Detection/Flood Alarm
These are lifesavers! I have both fitted to my aquarium via my DIY built controller and these alarms have saved me.
As humans, we all make mistakes, forget to turn something back on, drink alcohol while doing maintenance etc and we forget!
You can buy or create your own simple devices that can alert you straight away to a leak or an impending leak, so you can take action to prevent any further mess.
Pretty much all the aquarium controllers available today have this function and you can also have them shut down pumps, send you texts etc to help prevent the chaos getting worse.
If you cannot afford a controller, you can purchase a simple flood detection alarm that sits next to your sump and notifies you that you have water where you shouldn’t.
This one HERE at Amazon.com works great by sounding an audible alarm and linking to an app on your smartphone to provide an alert if you are not home to hear it! Oh, and it’s cheap! Please get one at the very least. You will not regret it!
Electrical Safety
Electrical safety with aquariums is absolutely paramount, ESPECIALLY with saltwater!
The two main hazards we are looking at here are electrocution and fire and both of them need to be considered carefully on how to prevent both, ALL THE TIME.
Electrical Shock
If you have a faulty piece of equipment or an item falls into the sump while you are working in it, you are going to be in real trouble if you have not taken the following precautions. Saltwater especially, conducts electricity so well that you need to be careful and do the following steps:
Ensure all equipment has drip loops in the cable
If electrical sockets are close, cover them with external weatherproof covers
Ensure any electrical equipment is securely fastened to the aquarium stand or similar
Do not rest Refugium light fixtures on the top of the sump. Suspend them or use a fixing kit
Beware of salt creep – Keep it cleaned off electrical items at all time
Unplug any item while working on it
Beware of water splashing on an electrical item
Keep a close eye on ‘Glass Heaters’, they can crack and cause electrocution.
To further aid in protecting you, have your plug outlets replaced to GFCI receptacles. These are designed to monitor the items plugged into them and trip at the first sign of a fault.
If you cannot afford an electrician to replace your receptacles you can use a GFCI Adapter that you plug into the wall.
This GFCI Adapter from Amazon.com is perfect for helping to keep you safe. As with everything be sure to test the manual test function regularly.
Many people complain about GFCI breakers or receptacles tripping and causing a tank crash. If it is tripping there is a piece of equipment that is not working correctly and you need to further investigate.
Fire
Fire is the second major concern with electrical safety. As mentioned before, saltwater is very conductive to electricity and an improperly protected device could ignite when it fails and cause a fire.
Fire can start in an aquarium stand and spread to the surrounding items.
A good tip I got told a few years ago and I still use it to this day is to install a small smoke alarm inside the stand of your aquarium or the ceiling of your fish room.
Early detection is essential for the protection of not only your aquarium but also your home and family
If you wish to find out even more problems areas that can cause you stress with your aquarium installation I highly recommend you have a read of this article I wrote: Aquarium Flood & Leak Prevention – 18 Problem Areas
Which Is Better – Aquarium Sump Or Canister Filter?
For many of you that have had an aquarium before you will be familiar with e the canister filter, but for those who are completely new to aquariums, a canister filter is a sealed canister that contains a pump that sucks water from your display tank, passes it through the various filter media to provide the cleaning and then returns the water back into the tank.
These type of filters are very popular in the freshwater aquarium hobby and they work well. They are relatively easy to maintain and are simple to set up.
I would recommend these for a freshwater tropical aquarium but not for a saltwater aquarium. I have found that they can be easily forgotten as they get tucked away and then owners procrastinate in cleaning them.
This leads to high Nitrate levels from the detritus (waste & debris) building in the filter media. To find out more on Nitrate and the Nitrogen Cycle Click Here to read my article.
The other main problems with these are that you are limited to how much filter media they can hold and you still have to have some equipment in the display tank. Eg: Protein Skimmer, Heater, Chiller (If required) Supplemental Media Reactors, Refugiums etc.
These are a good filter, but in my opinion for a freshwater tropical aquarium only. You can find out more about using canister filters from my article: Can You Use A Canister Filter For A Reef Aquarium?
To Finish
Well, there you have it folks, pretty much everything I could think of that you would need to learn about installing a sump on your aquarium. Sumps are such a great addition and there is a reason when over 95% of saltwater aquarium owners use one and if you have a freshwater aquarium, it allows you to hide all of the equipment to allow the full beauty of the tank to be seen without distraction!
Further Reading
If you found this article helpful may I suggest a few more for you:
Phosphate is an important but often overlooked parameter in a saltwater aquarium. High levels of phosphate can prevent the skeletal growth of coral and fuel horrendous algae blooms!
I had no idea about phosphate until my corals were not growing and a fellow reefer asked me what my phosphate level was! From that point on I soon found out how phosphate affected my aquarium!
Aquarium phosphate can be lowered using RO/DI filtered water, reduced feeding & fish stocking, regular maintenance & detritus removal, and liquid & granular binding products. Phosphate should be kept under 0.50ppm for fish-only tanks, 0.05ppm for mixed coral tanks, & 0.03ppm for SPS dominant tanks.
The best way to combat high levels of phosphate is a multi-angled approach after you have decided what the maximum level of phosphate can be tolerated by the type of aquarium you own.
What Should My Reef Tank Phosphate Level Be?
To ensure a healthy saltwater aquarium here is the recommended maximum phosphate level you should aim to keep your type of aquarium under:
Aquarium Type
Max Phosphate Level
Fish-Only Tank
0.50 ppm
Mixed Reef Tank
0.05 ppm
SPS Dominant Tank
0.03 ppm
ppm = Parts Per Milion
Be advised that you will need SOME phosphate in your aquarium to be used by your corals to grow, so going overboard and completely stripping your water of phosphate will have the same effect of slow coral growth as having too much! The key is to find a balance for your system, as every tank is different!
Now we have the limits recommended by the hobby in mind let’s look at what phosphate is, where it comes from, how it affects the tank, and how to manage it. If this interests you then please read on!
Ways To Lower Phosphate In a Saltwater Aquarium
There are four main ways to help lower the phosphate level in your aquarium:
1. Physical Removal
Your aquarium is an enclosed bio-system that will naturally build up phosphate over time. Phosphate introduced in water during initial fill and water changes, phosphate that was bound up in sand, rock, and coral skeletons begin to leach out, uneaten food, and fish poop begin to decay.
Each time you vacuum your sand bed, blast off crud settled in your rock with a turkey baster, and scrape your glass you are getting the phosphate-laden material into the water column and then physically removed when completing a water change. If you then replace that water with RO/DI filtered water, your phosphate level will reduce over time.
More Out, Than More In = Reducing Level of Phosphate!
2. A Protein Skimmer
A correctly sized, clean and efficiently working protein skimmer is another great way to help keep phosphate low. The skimmer’s job is to remove Dissolved Organic Waste. Waste, as we know, breaks down and releases the phosphate bound up within it into the water.
By allowing your skimmer to move this waste into the collection cup and then emptying that cup, you have now removed that material before it has a chance to release the phosphates bound up within it back into the water.
3. Refugium or Turf Algae Scrubber
Algae is a wonderful consumer of phosphate and if you can spare the room, adding a Refugium and/or possibly an Algae Turf Scrubber to your system will greatly improve your phosphate reduction.
When you have an abundance of algae growing in your aquarium it is a sign that your phosphate and usually nitrate levels are high. These two elements are the food that algae feeds on.
Lots of Algae = Lots of Phosphate and Nitrate!
Growing Macro-Algae in a Refugium and then physically removing half of the algae mass as it grows instantly removes the phosphate that is bound up in the algae. This process also helps to remove nitrates at the same time.
There are many benefits to having a Refugium on your system and you can learn more about them in my Refugium Article which you can find HERE…
The other excellent device you could look at implementing is an Algae Turf Scrubber. This device cascades your aquarium water down a plastic mesh which is lit by a ‘Plant Growth’ bulb. As the algae grows, it consumes phosphate and nitrate which you then remove, clean the mesh, and put back into service. As the algae grows again, it consumes more Phosphate and Nitrate. Rinse and Repeat as the saying goes!
DIY Algae Turf Scrubber Mesh
If you wish to find out more on Algae Turf Scrubbers please check out my article on them HERE. This is one of the next products on my list to fit to my system – I just have to find the room!
4. Chemical Absorption Products
Granular Ferric Oxide (GFO)
This is a product very popular for long-term Phosphate control. Most aquarists use this at an early point in the life of their aquarium after using other products to lower the phosphate to the desired level.
Think of GFO as a maintainer-type of product.
It works by absorbing the phosphate compound and chemically binding it to the Ferric Oxide. As your mass of GFO becomes used up the phosphate level will begin to rise. It is at this point you remove the GFO media, dispose of it and replace it with new.
GFO can be used in a mesh bag but it is prone to clumping so the most efficient way to implement GFO is in a reactor which allows the granules to ‘Bubble’ as the water flows through it. Once GFO is used for long-term maintenance, it can last 1-3 months between changes, depending on your Phosphate level.
This is another common product and it is mainly used for rapid phosphate removal. You have to be careful using this product, as with any rapid change in water chemistry, you can send your aquarium into shock and cause your tank to crash.
This product also absorbs the phosphate compound and binds it to the Aluminum Oxide, but rapidly. Usually, this product will need to be replaced weekly.
Aluminum Oxide does not clump together like GFO so it can be placed into a mesh bag and added into your sump or aquarium until it has lowered your Phosphate to the required level.
This product is used more to lower your Phosphate, and then GFO will be used to maintain that desired level.
PhosGuard is the most popular Aluminum Oxide. You can find it Here at Amazon.com
Liquid Phosphate Removers
Products such as Blue Life Phosphate Rx, Brightwell Phosphate-E and Ultralife Reef Liquid Phosphate Remover chemically attract and bind the phosphate and precipitate it out of the water.
This is where it allows the liquid binding agent and its attached phosphate compound to come out of dissolved form and become a solid, at which point your protein skimmer and filtration media will collect it ready for removal by you.
Most of the liquid phosphate removers work best when added to the area in which your protein skimmer is located. As the liquid binds your phosphate it will instantly be removed. Any liquid that doesn’t make it straight into the skimmer will be caught and removed later.
Phosphates are one form of the phosphor compound. They are an organic salt that is found in all living things. Your aquarium is an enclosed ecosystem and your levels of phosphate will slowly build over time if you do nothing to remove them.
Some level of phosphate is beneficial, but if allows to build up over 0.05ppm you could being to see increased algae blooms and slow coral growth.
How Does Phosphate Affect an Aquarium?
High levels on phosphate in a saltwater aquairum will slow coral growth by inhibiting the corals ability to absorb calcium from the water used to build their skeletons. It is also a major food source of algae which encourages algae blooms that can starve the aquarium and corals of light and oxygen.
Lets look a bit deeper in to each of these:
1. Slow Coral Growth
Once phosphate begins to reach levels above 0.05ppm it begins to inhibit the precipitation of calcium carbonate from the water. When a coral like Acropora, Montipora, or Torches, for instance, wishes to build their skeletons they consume calcium carbonate from the water as one of the main building blocks.
My SPS are growing well now!
When phosphate levels begin to inhibit this uptake of calcium carbonate the coral stops growing and can even die if it is unable to consume enough calcium carbonate from its surrounding environment.
This was what was happening to me. My phosphate was at 0.1ppm which didn’t seem high, but it was enough to make my corals grow at a snail’s pace! Once I tested and found this I lowered my phosphate to 0.03ppm and my coral begin growing rapidly.
2. Increased Algae Growth
Phosphate is loved by plant-based organisms and when it is available in high enough quantity in our aquariums they can fuel rapid and sometimes fatal algal blooms. Not only do the algae blooms look hideous and can be a major battle to overcome, they can smother corals to the point of death.
Luckily for us, we can use algae’s love for phosphate to our advantage by growing and disposing of algae in a Refugium or Algae Turf Scrubber. Keep reading to find out more about these superb additions to an aquarium!
If you find you are having excessive algae growth and your corals seem to be growing slowly, you may no understand which parameter you need to test for!
Where Does Phosphate Come From In An Aquarium?
There are three main sources of introduction to our aquariums:
1. Fish Waste/Detritus
Fish waste and dead or decaying matter will all release phosphate into the water. As these items break down, they release the phosphate that is bound up inside them into the water column.
The more fish you have in your aquarium, the more excrement and detritus you will have, therefore the more your maintenance and phosphate management techniques have to deal with to prevent the phosphate level from rising above the acceptable limit for your type of aquarium.
2. Fish Food and Over-Feeding
Fish food, especially flake food, has always been known to be high in phosphate. Over-feeding is a sure way to have your phosphate level begin to increase. Just as waste and detritus above, any uneaten food begins to break down and it releases its trapped phosphate into the water.
3. Poor Quality Fresh Water
Unfiltered city or well water is usually the main culprit for introducing phosphate into your aquarium. The use of a maintained and high-quality RO/DI water filter system will ensure you have water with no pollutants or phosphate for use when adding ANY water to your aquarium, be it via the Auto Top-Off System or when making a new batch of saltwater for your water changes or the initial aquarium fill.
TBR Recommends
A Good Quality RO/DI Water Filter Help Will Prevent So Many Water Problems!
What to be Aware of When Lowering Phosphate in an Aquarium?
Some phosphate removal products can rapidly remove/lower your phosphate. This sudden change can shock your aquarium inhabitants. Test your water then decide how much you want to lower phosphate for this week, then dose accordingly. Slowly repeat until you have your desired phosphate level.
Once you have reached your desired level maintain using GFO or just regular water changes, depending on how much your phosphate increases each week/month.
The maximum recommended rate for phosphate removal is no more the 1ppm per day, especially if your aquarium has had a high phosphate level for more than a few weeks.
Take your time and allow the phosphate level to gradually reduce and allow your bio-system time to change to the reducing levels.
How Do You Test For Phosphate In Aquariums?
Phosphate in an aquarium can be tested using a phosphate test kit or the digital Hanna Checkers. The Hanna HI1713LR measures 0-2.5ppm and is good for fish-only tanks, whereas the Hanna HI774 ULR measures 0-0.09ppm with greater accuracy in the low end. Perfect for mixed reef and SPS dominant tanks.
In my opinion and that of many other experienced aquarists, there is only one true test kit: The Hanna Phosphate Checker Series
Select the Checker that matches your phosphate level. Each Checker measures to a specific range of Phosphate.
The Hanna HI713 LR (Low Range) Phosphate Checker is best used for Freshwater or Fish Only aquariums where the Phosphate levels being tested for can be higher. The LR checker is not able to test low enough for any aquarist keeping corals, especially LPS and SPS.
Hanna HI774 ULR (Ultra Low Range) Phosphate Checker is used to test for the absolute lowest level of Phosphate in your aquarium. When your level is too low for the LR tester, this Checker measures down into the very low range allowing you to test for even the smallest traces of Phosphate. This is a great device for the experienced SPS keeper who wants to keep their Phosphate at a very accurate and low level.
All of these testers use the Orthophosphate Analysis Method which is a way to test for phosphate without using a prepared sample involving a digestion acid. The Hanna Checkers use a combination of an Ascorbic Acid, an LED light source and a Silicon Light Detector to provide you with a simple, accurate and easy-to-use tester.
Most of the other test kits on the market are unable to test in a range low enough to be of any use to coral keepers.
The key to keeping phosphate low is a multi-angled approach. Good aquarium maintenance, quality water filtration, and a low aquarium bio-load will keep your phosphates low.
Maintaining this by using a product like GFO will see you well on your way to rapidly growing, colorful and healthy corals.