When I built my aquarium system and I decided to put my sump in the basement, I knew a regular return pump was not going to be strong enough to push the water back up to the aquarium at the correct flow rate.
The task of selecting a new pump took me into an area of aquariums I had never really paid much attention to before!
Return pumps flow should be 5-10x aquarium volume every hour. The pump flow should match the flow rate recommended for the protein skimmer to ensure maximum filtering efficiency. Return pipe bends, diameter & pumping height all reduce flow rate which must be accounted for, but is easily calculated.
In this article, I am going to talk about many types of Return Pump and how to size & select the correct pump to perfectly match your system.
What Does An Aquarium Return Pump Do?
A return pump is used to move water back to the main display part of the aquarium after it has drained into and ran through the filter section. Return pumps can be installed in rear compartments of All-In-One aquariums or located in a sump mounted below the main aquarium.
As water drains from your display tank and into your sump you need a way to move that water back into the display tank, this is where the Return Pump comes in. However, it is not just a matter of taking a pump off the shelf, connecting it to the plumbing and turning it on.
There are numerous things that you need to take into consideration before buying. Keep reading to find out what those considerations are.
To find out more about Aquarium Sumps you can read my article HERE.
How To Size An Aquarium Return Pump?
Aquarium return pumps should pump between 5-10x the aquarium volume every hour. A 30 gallon tank would need a pump with a minimum of 150 gallons per hour flow. For tanks with protein skimmers, the pump flow should match the protein skimmer flow rate to ensure maximum filtration efficiency.
Having a flow rate through the sump that is higher or lower than the recommended protein skimmer flow rate will just cause it to work less efficiently.
We all know the saying about planning etc and this is no different. Finding the correct return pump is not that difficult and I think the best way to teach you is by going through a pump selection.
We are going to base this example on the following:
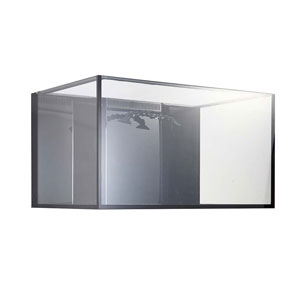
- Aqueon 75G Reef Ready Aquarium
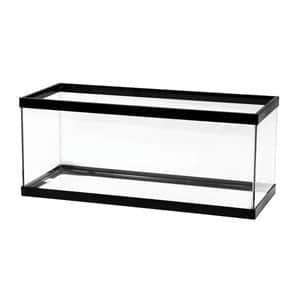
- Aqueon 20G Long Aquarium for Sump
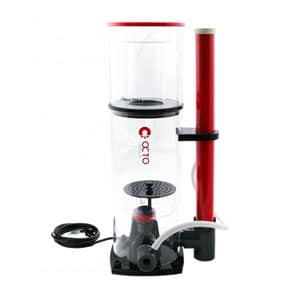
- Reef Octopus Classic 150 SSS Protein Skimmer
All Values & Specifications found on manufacturers websites or within product instructions
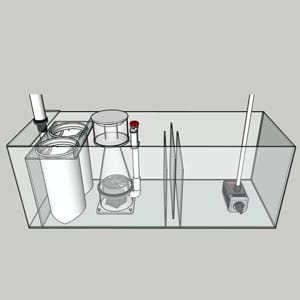
Setup Example #1
Sump in Stand under Aquarium
Max Flow Rate of Reef Ready Overflow: 600GPH
Max Flow Rate of Protein Skimmer Pump: 198GPH
Height from Return Pump to Outlet Nozzle: 26+21 = 47″
- Stand Height: 30″ -4″ for feet and Base: 26″
- Height of Aquarium: 21″
Flexible Braided Hose from Pump to Tank – Easy to install within the stand and minimal pipe friction.
∴ We need to find a pump that will give us 200GPH through sump at 47″ (4ft) Head Loss:
Internal Submersible Pump
(Amazon.com Links)
$:
Sicce Syncra Silent 1.0 251GPH @ 5ft
$$:
Eheim CompactON 2100 369GPH @ 7.8ft
$$$:
IM MightyJet Midsize 538GPH @ 8ft
Return pumps should have a valve installed on the return line to throttle the flow down a little. It is always better to buy a bigger pump and throttle down than to buy an undersized pump and never reach your target flow rate. This example is 200GPH.
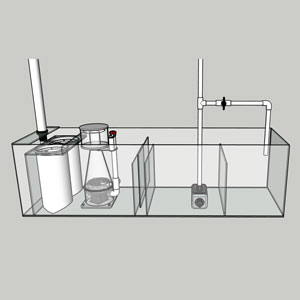
Setup Example #2
Sump in Basement under Aquarium Stand
Max Flow Rate of Reef Ready Overflow: 600GPH
Max Flow Rate of Protein Skimmer Pump: 198GPH
Height from Return Pump to Outlet Nozzle: 30+21+48+12 = 111″ (≈9ft)
- Stand Height: 30″
- Height of Aquarium: 21″
- Sump Located on a Counter 48” from Ceiling
- Floor Joists & Ceiling Void: 12″
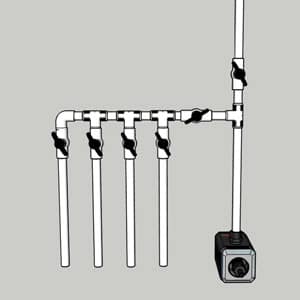
Schedule 40 Rigid PVC Plumbing with manifold to supply:
- 1/10HP JBJ Arctica Chiller Min 240GPH
- Carbon Reactor Single Stage 295GPH
- GFO Reactor Single Stage 295GPH
The limiting factor with these figures is the reactors are recommending almost 300GPH. You will find that the pumps that can lift water to a 9ft head height will easily deliver this flow rate to all the manifold and the sump with flow to spare.
∴ We need to find a pump that will give us 300GPH AND can lift to over 9ft:
Internal Submersible & External Pumps
(Amazon.com & AquariumSpecialty.com Links)
$
LA Quiet One Pro 5000 594GPH @ 9.8ft
$$
Eheim 1262 Universal 300GPH @10ft
$$$
EcoTech Vectra S2 1400GPH @11ft
All outlets on the manifold and the return lines will need to have valves installed to correctly set the flow rate required for each piece of equipment.
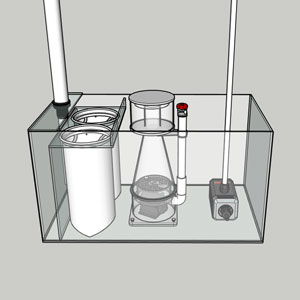
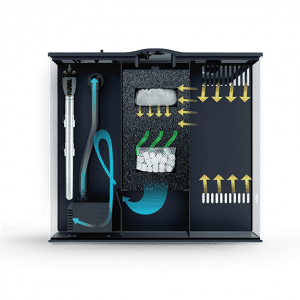
Where Do You Place An Aquarium Return Pump?
The return pump will go somewhere in your sump. Depending on the design or type of sump you have, will determine which section it goes into. Most sumps will have a section called the ‘Return Section’ that is specifically designed to house your Return Pump.
If you have an All-in-One aquarium, the setup will already include a Return Section with a pump pre-installed.
What Is Aquarium Plumbing Friction & Head Loss?
Plumbing Friction & Headloss! What the heck does that mean?? Let’s tackle these one at a time:
1. Plumbing Friction
When water travels through a pipe it is subject to the friction created by the inside walls of the pipe. The smoother the pipe, the easier it is for the water to flow through it.
Think about how easy it is to slide down a water slide compared to a fiberglass slide on a playground. Each time you add a bend, valve or a junction in the plumbing it creates friction and this friction adds up. The size of
If you are running a sump in the stand below your aquarium, most people will plumb the return pump to the aquarium with flexible vinyl tubing like THIS from Amazon.com
Flexible PVC hose allows you to smoothly route the pipe to the tank connections and allows for the least amount of plumbing friction and the braided type of hose prevents the pump pressure from bursting the hose.
If you are running a remote sump, most people will permanently plumb the route in Schedule 40 PVC Solid Pipe. White is the color it comes in at the hardware store but Amazon.com has managed to find it in a range of colors which you can find here:
Colored Pipe Here
Colored Fittings Here
There are some really nice plumbing installations using the colored PVC pipe.
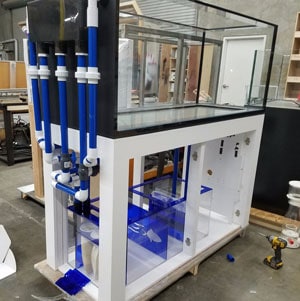
This type of pipe allows for a really neat and permanent installation, but the addition of elbows, tee’s and valves will all add a little to the friction.
Here are some ballpark figures for flow loss per fitting:
• A loss of 50 to 75 GPH for each 90° elbow
• A loss of 30 to 50 GPH for each 45° elbow
• A loss of 50 to 75 GPH for each swing check valve
• A loss of 20 to 40 GPH for each ball valve
• A loss of ~ 3 to 5 GPH for each union
2. Head Loss
Head Loss is the pressure created when water is pumped vertically upwards. Most pumps will have a ‘Head Loss Chart’ that you can use to see what the flow rate would be at a certain height above the pump.
As a Rule-of-Thumb you can expect a loss of 75 to 125 GPH for each foot of height (from the return pump to the display tank return nozzle/s). This is the chart I used for my Reeflo Pump when I was designing my system installation:
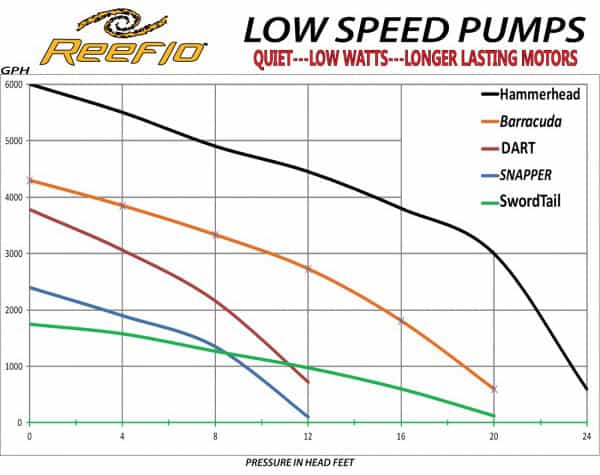
I have the Reeflo Dart and the top lip of my display tank sits 12ft above the pump. Using this chart it gives me 800 gallons/hour (GPH), which is plenty to run my sump and manifold with attached equipment.
When you are designing your system you want to have as little plumbing friction and head loss as you can.
Friction & Head Loss = Reduced Flow
This handy calculator from the guys at Reef Central is a great tool for totaling up all your fittings, height and plumbing size to give you an estimated flow rate at your display tank.
==> Click Here for Reef Central Calculator <==
Plumbing Friction & Head Loss is not a problem, it is just something you have to think about when you are looking at which pump to purchase.
If the calculator gave you a flow rate of 320GPH after you put in your details, this is the flow rate you will be getting at the end of the pipe in your display tank.
What Are Aquarium Manifolds?
An aquarium manifold is a series of pipe fittings glued together to allow additional equipment to run using just one pump. A manifold is usually Tee’d off the return pump’s main pipe heading back to the display tank. The manifold has branches with valves on each to feed water to other equipment.
Typical equipment fed off a return manifold are:
- Refugium
- Chiller
- GFO Reactor
- Carbon Reactor
- Calcium Reactor
- Bio-Pellet Reactor
Installing a manifold allows you to easily add equipment in the future, BUT each item you add will require a certain flow rate to operate at its maximum efficiency. All of this needs to be taken into account when selecting your return pump.
The other point you need to keep in mind is that all the equipment running off your manifold should be constantly running equipment, ie always having water run through them.
If you have an item that turns the flow on and off it will cause the pressure in your return line to fluctuate and this will cause your return outlets to surge causing splashing and bubbles.
Internal vs External Aquarium Return Pumps – What’s Different?
A good majority of the pumps are available to be installed within the sump or plumbed externally of the sump. There are pros and cons to both installation methods and your setup location will dictate which method you can use.
The internal method is great for sumps installed in the stand as all the return pumps will be all exceed that head loss. You will need to look at external pumps once you need to pump from a remote location and you are pumping up high.
The only real drawback with internal pumps is that it will put all the heat it creates back into the water, whereas most of the dedicated external pumps will have a cooling fan.
AC vs DC Aquarium Pumps
All of the pumps mentioned above, apart from the EcoTech Vectra, are all traditional electrical AC pumps, ie: just plug them straight into the wall outlet.
In recent years there has been
The benefit to DC pumps is that the speed of them can be controlled. This allows you to set the flow rate being delivered by the pump by pressing a button or turning a dial.
Most of the DC pumps have their own App you can use to completely control your pump remotely or the pump controller can be linked to some of the advanced aquarium controllers such as a Neptune Apex HERE at AquariumSpecialty.com, which can give you some great additional features.
One of the best benefits to DC pumps, especially the EcoTech range, can have a battery backup installed so in the event of a power outage your sump and display tank will still turnover for a set amount of time.
The downside to the DC pumps is that they are expensive compared to their AC siblings, but the benefits they provide may make them preferable to you.
How Do You Calculate Aquarium Flow Rate?
Unless you have a flow meter handy this is an area that causes alot of aquarium owners some hassle, but there is an easy way to find it out!
If you need to find out the flow off a manifold outlet so you can adjust it to 150GPH, here is what you do:
- Get a large bucket or container
- Place the container under the manifold nozzle or attach a flexible pipe if space is limited, and pipe it to the bucket
- Open the valve 1/4 turn and fill the container for 15 seconds
- Turn off the valve at 15 seconds
- Using a measuring jug, meter out how much water was collected in the container and make a note
- Let’s say you collected 1.5 liters in 15 seconds
- 60 Seconds / 15 = 4, so 1.5 liters x 4 = 6 liters in 1 minute
- 6 liters x 60 Minutes = 360 liters per hour
- 1 liter = 0.264 US Gallons
- 360 liters x 0.264 = 95 GPH
We had opened the valve 1/4 turn to get these numbers, so opening the valve approx 1/2 way should give around 200GPH.
If 15 Seconds fills the container too quickly, try 5 seconds then multiply Step 7 by 12 instead of 4. (eg: 1.5 x 12) (60 Seconds / 5 Seconds = 12)
Aquarium Pump Operating Cost Comparisons
The cost to operate a pump is very rarely thought about by most aquarists. The rising costs of electricity can make people start to think about how to create a system that may be expensive to purchase initially but will cost less to run in the long term.
To find out how much your pump is going to run each year you need two numbers:
- Wattage of the pump
- Electricity price per Kilowatt Hour (KWH) where you live
Pump Wattage x 24 (hours) = Total Watts Used Each Day
Total Watts / 1000 = KHW Used Each Day
then
Total KWH Used Each Day x Electricity Cost per KWH = Cost Per Day
then
Cost Per Day x 365 = Total Cost to Run Each Year
Eg: Electricity Cost @ 15¢ per KWH
55W Pump
55 x 24 hours = 1320 Watts Used Each Day
1320 / 1000 = 1.32 KWH Used Each Day
1.32 KWH x $0.15 = 19.8¢ Each Day
$0.198 x 365 Days = $72.27 To Run Pump Each Year
$72.27 x 5 = $361.35 to Run for 5 Years
95W Pump
95 x 24 = 2280 Watts Used Each Day
2280 / 1000 = 2.28 KWH Used Each Day
2.28 x $0.15 = 34.2¢ Each Day
$0.342 x 365 = $124.83 To Run Pump Each Year
$124.83 x 5 = $624.15 to Run for 5 Years
The main thing to consider here is pump cost over its running lifetime. I used 5 years here, but it’s not uncommon for a good quality aquarium pump to last 10+ years.
You can see that a pump with twice the wattage is going to cost twice as much to run each year.
When looking at return pumps it is usually very worthwhile to spend the extra $100, $200, $300 upfront when purchasing as you will easily recoup this cost back over many years of savings, due to the lower wattage.
How To Stop Aquarium Pump Noise & Vibrations?
With the majority of aquariums being in the Living Room and some in Bedrooms, the operating noise needs to be kept to an absolute minimum.
Return pumps can be noisy and if installed incorrectly can cause a
Here are some tips for reducing both noise and vibrations:
- Internal pumps are generally quieter
- Place the pump on a silicone or rubber mat Like This
- Ensure the pump case is not touching the sides of
sump , stand, pipework etc - When plumbing in rigid pipe, have a short piece (6″) of Flexible PVC pipe between the pump and rigid pipe
Aquarium Pump Maintenance & Backups
Maintenance is a main part of keeping an aquarium and a good bit of thought during the design phase of your system will always payoff in the long run. Trust me!
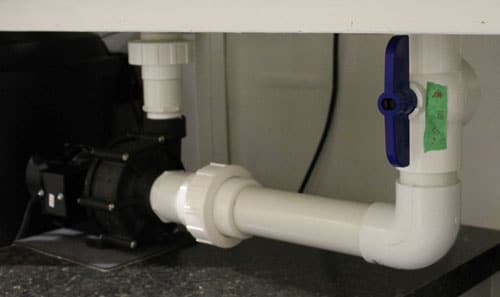
Any pump installed into your system, especially if your plumbing is rigid PVC needs to be done properly.
Each side of the pump needs an isolating valve and a union fitting. You can then easily isolate the water, undo the unions and remove the pump for maintenance, cleaning and replacement.
I regularly remove my return pump, disassemble the pump and clean the crud off the impeller. Even a slight buildup of fuzz can really reduce the pumping efficiency.
If your pump is external and has a cooling fan, give that a brush too and keep it clean.
The MOST IMPORTANT TIP I can give you about your return pump is this…Buy A Spare!
I know they are expensive but it will save your tank! You can bet if it fails it will be at that start of a long weekend when your local fish store is shut, or you have to wait for the replacement to be delivered!
Get the spare and plumb it EXACTLY the same so it’s a simple job to swap it out if it fails. It may not be you changing it either! What if you are on vacation and you have a fish sitter!
You will learn that when things go wrong, they go wrong fast. Prepare as much as you can and you will beat off the Grimm Reaper to your tank!
Aquarium Return Pump Selection Conclusion
As you have seen over this article there is a vast selection of pump types to pick from depending on how you are looking to design your system.
You can view a tremendous range of Return Pumps HERE at AquariumSpecialty.
You will be able to find one that will fit your system perfectly!
After deciding what kind of pump you wish to have I would go and read the reviews, keeping an open mind. There are some awesome pumps out there with a proven track record for reliability.
A return pump is not a place to skimp on cost and by following some of the ideas I have given you I hope that you can find the best pump for your setup.
Further Reading:
Are you looking to install a sump into your new system?
Read my guide: Aquarium Sumps – Everything You Need To Know for some great information on setting up the perfect sump for your system.
I really, really advise you to run a Protein Skimmer on your aquarium but if you are new to saltwater you may be wondering what the heck one of those is! Read my Article: What Is A Protein Skimmer & Do I Need One? to help you understand all about them.
Your aquarium needs 3 types of filter media to work properly and filter effectively. By reading my article: Types Of Aquarium Filter Media & What They Do you can find out what you need!